- Overview
- Installation
- Installation Process and Flow
- Prerequisites
- Internet Access
- Services Infrastructure (Step 1)
- Azure Tenant (Step 1a)
- OpenAI signup (Step 1b)
- Create OpenAI service (Step 1c)
- Create OpenAI model deployment (Step 1d)
- Supported Operating Systems (Step 2)
- User account
- Supported Microsoft Word Versions
- Install Inprovio DPS (Step 3)
- Config.ini file vital configuration. (Step 4)
- Inprovio DPS first time execution. (Step 5)
- Configuration
- Operational Use
Overview
The Inprovio Proofreading (DPS) software is a lightweight, easy to use software application that enables the user to check documents created using Microsoft Word for spelling and grammar using Artificial Intelligence (AI) technology.
Inprovio DPS is simple to install and use and has been designed to run on a number of supported operating systems and requires minimal hardware resource.
Inprovio DPS requires all specified prerequisites to have been completed prior to installation. This document explains in detail the required prerequisites as well as how the Inprovio DPS installation should be completed as well as operational use of the software.
Installation
Installation Process and Flow
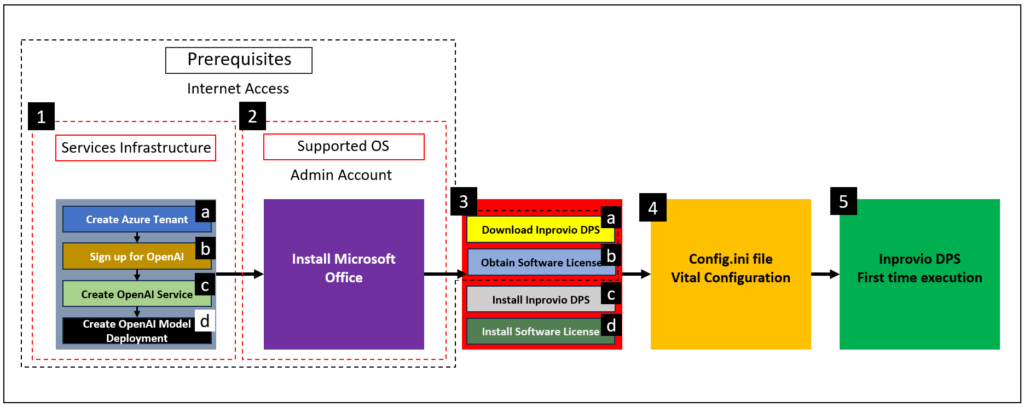
The following diagram shows the Inprovio DPS installation process including any prerequisites required and the order of each one.
Prerequisites
Internet Access
Internet access is required for various aspects of the installation, implementation and running of Inprovio DPS. Should Internet access not be available then the software will not run. This is because there are some configuration items loaded from resources that are located on resources on Internet storage and other services. Further information is available on request.
Services Infrastructure (Step 1)
Inprovio DPS leverages the power of AI. The AI technology used for Inprovio DPS is OpenAI hosted within Microsoft’s Azure Cloud platform. It is therefore necessary to create the required Azure service objects that allow Inprovio DPS to function.
Azure Tenant (Step 1a)
In order to create the required Azure service objects, an Azure account is required. Further information is available here that explains how to create an Azure account if one is not already available.
OpenAI signup (Step 1b)
At the time of writing the Azure OpenAI services were not on general release so a formalised request to join them was necessary. If this is still the case, then this step would need to be completed prior to the creation of the OpenAI service so please take advice from Microsoft. However it is assumed that this step will not be required when the OpenAI services are released for general usage.
Create OpenAI service (Step 1c)
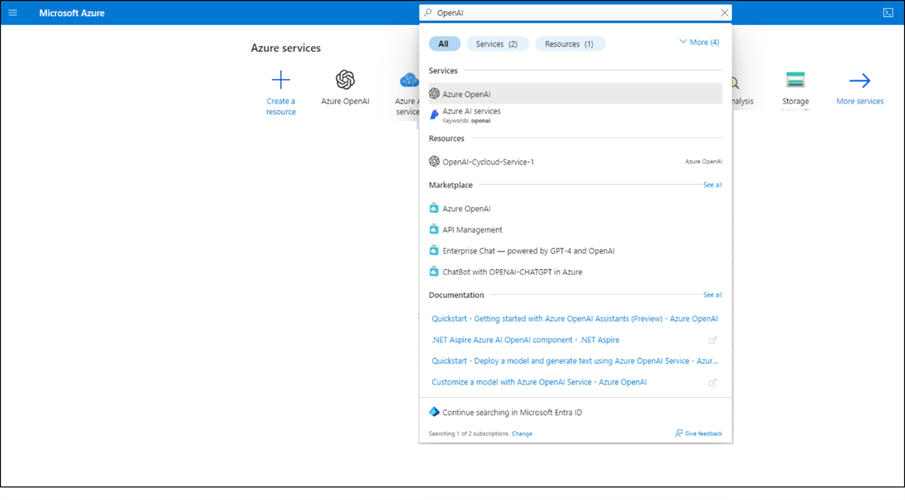
To create the OpenAI service it is necessary to firstly login to the Azure Administration portal. This can be found at the following URL. Once logged in, go to the search at the top of the page and type “OpenAI” as the diagram below shows.
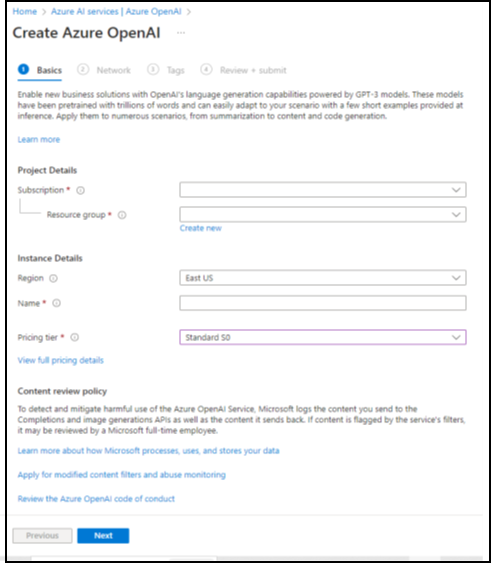
Select Azure OpenAI and then select “Create” from the top menu. This will provide the form to create the Azure OpenAI service. Fill in the form with the relevant information such as your Subscription, Resource Group and Region where you want the OpenAI service to be created. It is advised that the service is created in the region where the users that are going to be accessing it are based. This ensures that the latency is kept to a minimum. At the time of writing there was only one pricing tier available and that was “Standard S0”.
The name chosen for the OpenAI service will be required later when the configuration of the Inprovio DPS software is performed so please keep this to hand.
When all the information is entered, click next. This will allow the network access to be configured. Please select “All networks, including the internet can access this resource” which allows access to the service by anyone using the Inprovio DPS software.
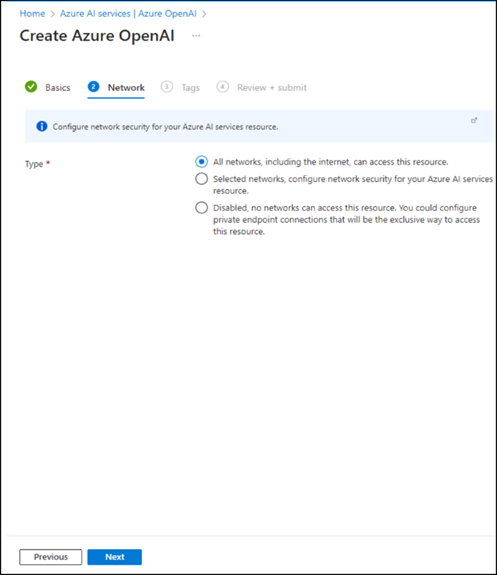
Click next and proceed to the next screen where tags can be added if required.
Click next and again and proceed to the “review and create” form. Review the configuration added and click Create.
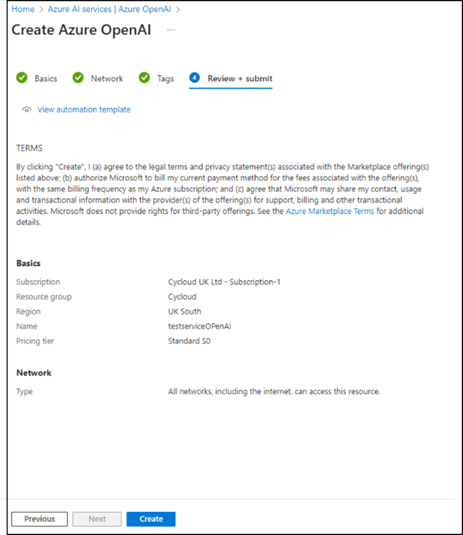
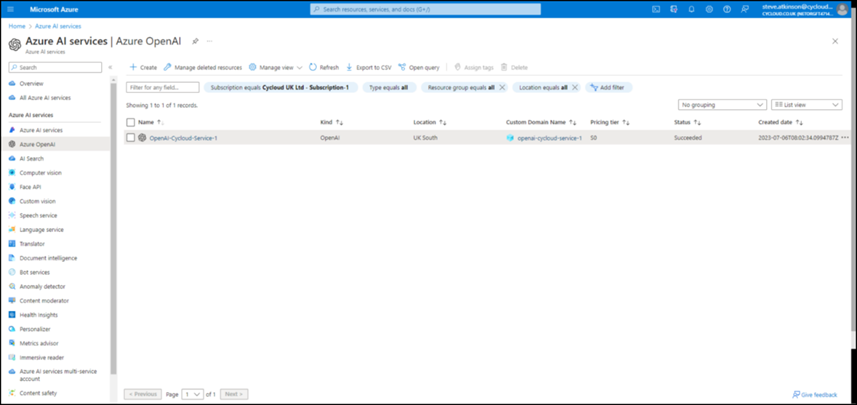
It will take a few minutes to create the service. After it is created it will be visible in the Azure portal.
Create OpenAI model deployment (Step 1d)
The OpenAI service created in the previous step is required to be deployed. This is achieved by creating a “Model Deployment”.
In order to do this simply select the previously created OpenAI service from the Azure portal.
On the left-hand side, under “Resource Management “you will see an option for “manage keys”. Clicking on this option will reveal the following form.
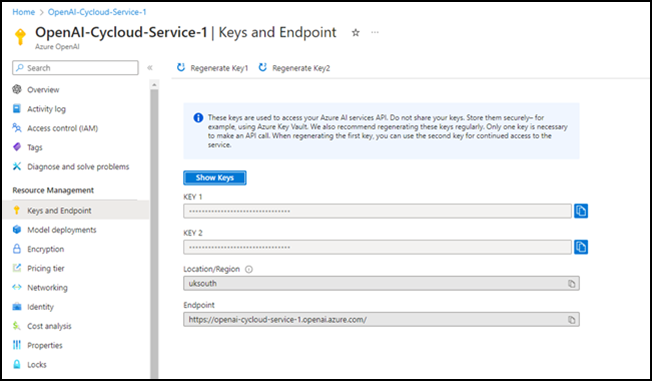
Copy either key 1 or key 2 to the clipboard by using the icon next to each in the form. Only one of these is required. Take a note of what the key is by recording it, as this will be required later when the configuration of the Inprovio DPS software is performed so please keep this to hand.
Next thing to do is select “Model Deployments” from the left-hand menu and then select “Manage Deployments” from the main form. You will then need to provide your subscription information and OpenAI service as the resource.
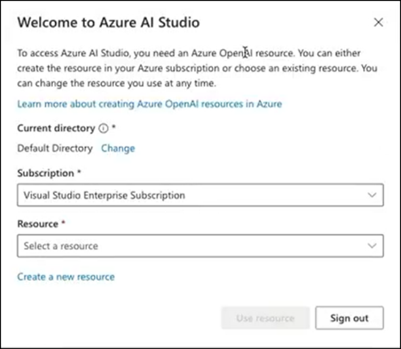
Once the subscription and OpenAI service has been selected and submitted using the form you will be placed into the OpenAI studio environment, and the following form will be displayed providing a means of creating a deployment.
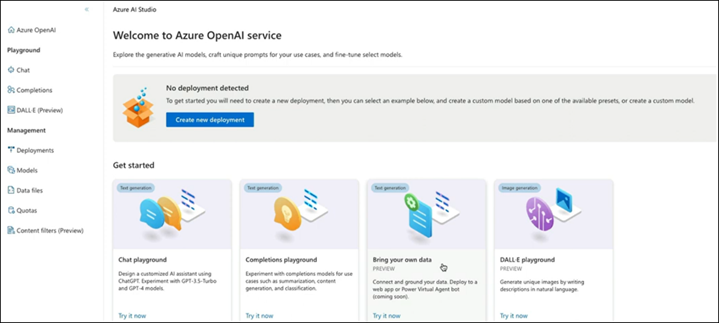
Selecting “Create new deployment” from the form will display the following form.
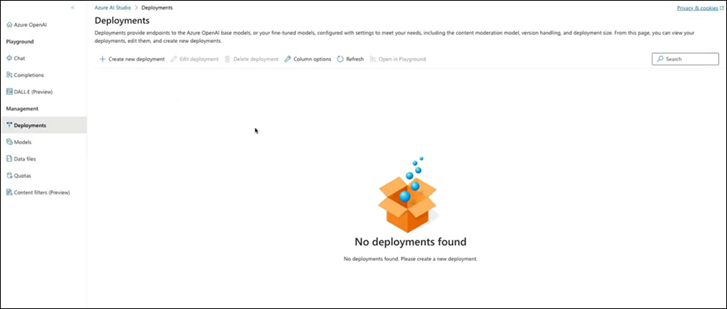
Select the “Create new deployment” option from the menu will open up the following form.
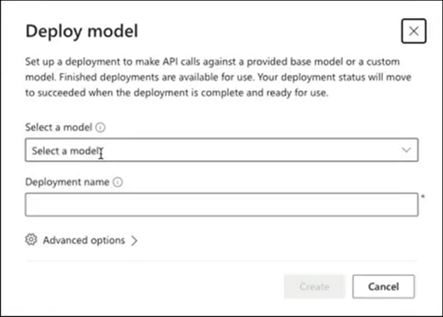
Select “gpt-35-turbo” from the “Select a model” dropdown box. When this is done another dropdown will appear that allows the select of the model.
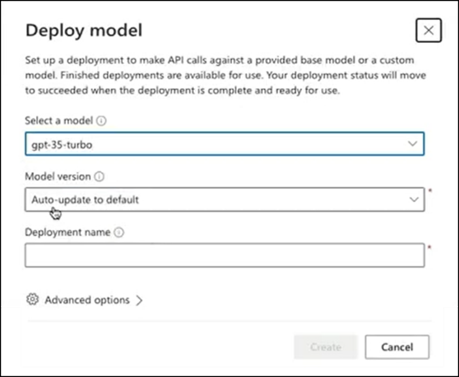
The model version should be 0613. This is the model that has been tested and is therefore recommended to use. Other model versions will be tested as and when they are released.
Input a name for the deployment in the “Deployment name” dropdown box and make a note of this for later as it will be needed in the configuration of the Inprovio DPS configuration.
Next click on the “Advanced option” which will show the flowing form.

The “Model name” will reflect your previous selection. The “Content Filter” dropdown should be set to “Default”. Ensure that the “Tokens per Minute Rate Limit” is set to a minimum of 120k (or whatever chosen capacity is available within your subscription). This setting is also dependant on how many users are using the OpenAI service simultaneously so it may need some thought as well as some testing to get the optimum setting. If a requirement for a higher quota, in terms of the “Tokens per Minute Rate Limit,”this is possible by contacting Microsoft directly in order to get the quota increased. Set the “Enable Dynamic Quota” to enabled. This setting will ensure that the Inprovio DPS software is able to best take advantage of the dynamic nature of the Azure cloud’s capabilities at any given time. Lastly select “Save and Close”
The deployment should be displayed within the Azure console at this point as the following form will acknowledge.
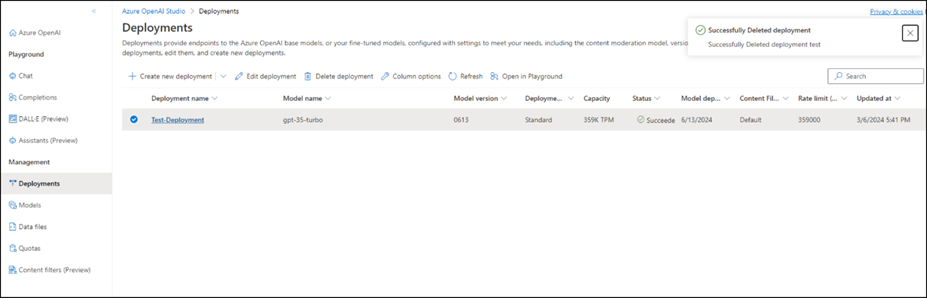
Each property of the deployment will be displayed in column format. Check these properties are correct before moving on. If they are not correct, they can be altered using the “Edit deployment” option from the menu.
It is important to note that even though deployments may be visible in the Azure console it may take some time for the deployment object to actually be created. In our testing we have observed times of up to 5 minutes before operational tasks can be performed.
Supported Operating Systems (Step 2)
Inprovio DMS software has been tested on all version of Windows 10 and 11. These operating systems are supported.
Server class as well multi-user operating system such as Windows multi-session or session host versions are not supported.
Supported operating systems running on physical hardware are supported. Solutions such as Citrix, VMWare or any other virtualisation technologies are not supported even when running a supported operating system.
User account
It is advised that the user account used for the installation and implementation of the Inprovio DPS software has administrative permissions. This allows all Inprovio features to be used. It is however, possible to use a standard user account with reduced Inprovio functionality.
Supported Microsoft Word Versions
All versions of Microsoft Word are supported from the version provided with Microsoft Office 2018 up to the latest version provided with Microsoft Office 365.
Install Inprovio DPS (Step 3)
The Inprovio DPS software can be downloaded from the Inprovio website at the following URL.
After downloading the software, simply unzip it to a directory of choice (A directory such as C:\Program Files\Inprovio-DPS would be logical) which will be known as the installation directory and run the “Inprovio-DPS.exe” executable.
The Inprovio DPS software requires a license in order to function. A license can be requested using the following form.
When a valid license has been obtained it will be in the form of a file. The file name will be “License.lic”. This file cannot be altered with any editors as that will invalidate the license and will not be able to be used. To install the license file all that is required is to copy it to the installation directory. The license will be used when the Inprovio-DPS.exe is run.
It is highly recommended that the license file is installed prior to running the Inprovio-DPS.exe for the first time to reduce errors however, should this not be the case, there are suitable warnings within the software to guide the installer to install the license which are self-explanatory.
The first time the “Inprovio-DPS.exe” is run a number of tasks are executed as follows.
- Create a config.ini file in the installation directory.
- Create a Documentation.txt file in the installation directory.
- Execute the EULA agreement form.
- Install the Inprovio DPS systray application.
The config.ini file is an ini file that holds all configuration information that the Inprovio DPS software requires to function.
The Documentation.txt file is a file that explains what every setting does within the config.ini file and also explains the default settings.
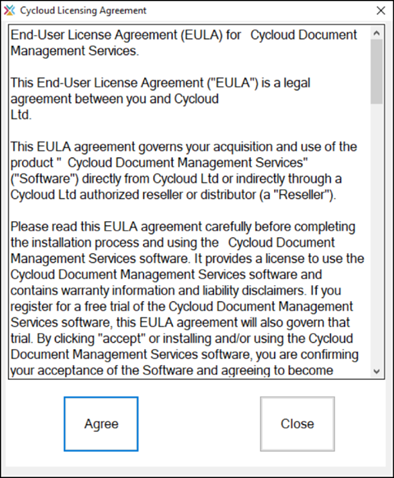
The Inprovio EULA is required to be agreed using the provided form.
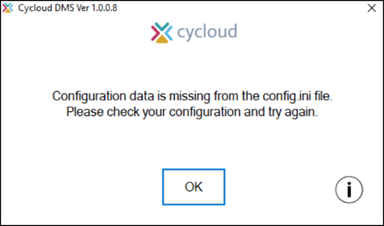
When the EULA has been agreed the software will execute however it is likely that the installer will be prompted with the following message informing them that configuration data is missing from the config.ini file. This is because there are three vital pieces of information that are needed in order for the Inprovio-DPS software to be able to work. Further information can be obtained by clicking the information icon within the prompt and also in detail in the next section.
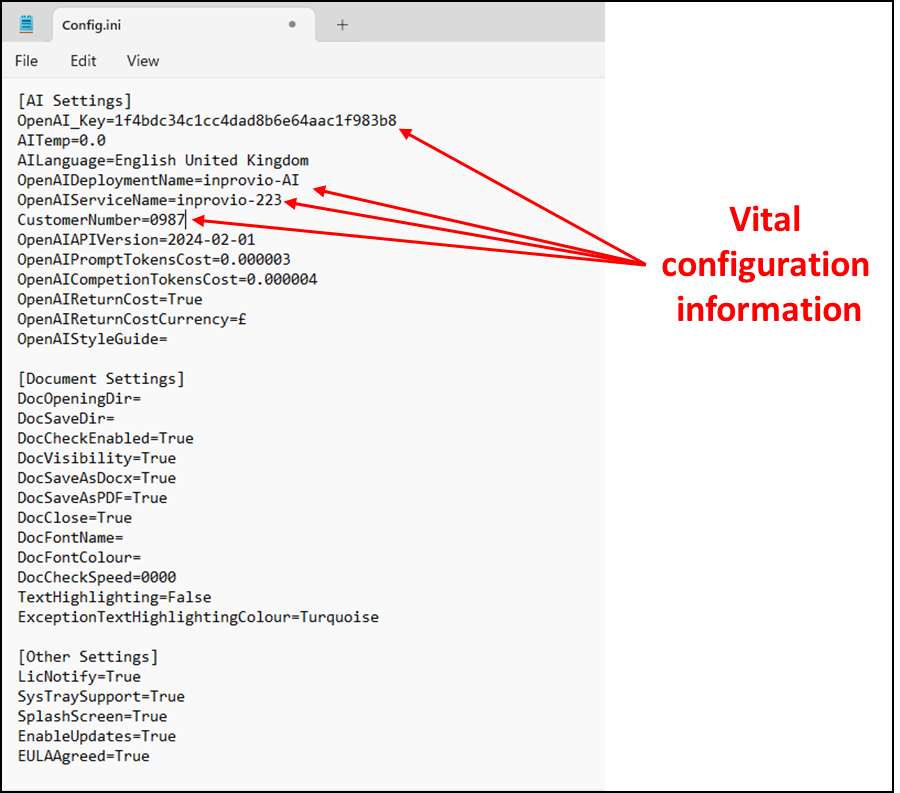
Config.ini file vital configuration. (Step 4)
The next thing is to configure the config.ini file with three vital pieces of information. This is required before the Inprovio DPS software will run.
The config.ini file is located in the installation directory.
In the [AI Settings] section of the config.ini file the following options require values.
OpenAI_Key=
OpenAIServiceName=
OpenAIDeploymentName=
CustomerNumber=
The “OpenAI_Key” option should be populated with the key that was noted from step 1d. This is the API key that the Inprovio DPS software uses to authenticate to the OpenAI service.
The “OpenAIServiceName” option should be populated with the name that was used in the creation of the OpenAI service in step 1c.
The “OpenAIDeploymentName” option should be populated with the name that was used in step 1d to name the deployment. After the three vital pieces of information are filled in within the config.ini file the Inprovio-DPS.exe can be run again.
The “CustomerNumber=” option represents the customer number assigned. This number is a unique number that is assigned to Inprovio customers when Inprovio products are purchased for the first time.
Below is an example of what the config.ini file should look like after entering the vital configuration information.
AI Service Performance
Purely by the very nature of Internet hosted services the performance of the AI Service can fluctuate based on demand and other factors. As the AI Service in this instance is hosted on Microsoft’s Azure Cloud it is subject to Microsoft’s SLA’s (Service Level Agreements). All SLA’s for every service hosted within Azure Cloud can be found here.
Should the AI service be unavailable for any reason then Inprovio DPS will inform the user however it’s unavailability can be for a number of reasons, from lack of Internet access to other configuration issues. It is therefore advised that all local configuration be checked before considering if the AI service itself.
Inprovio DPS first time execution. (Step 5)
Running the Inprovio DPS software is a simple matter of executing the Inprovio DPS.exe file from the installation directory.
After all vital previous steps have been completed successfully the last few tasks are completed prior to the Inprovio DPS opening.
The first is the creation of the directory structure within the installation directory. This directory structure consists of the following directories.
- Test-Documents
- Logs
- Checked-Documents
The “Test-Documents” directory contains documents that are for testing of the Inprovio DPS software.
The “Logs” directory is where log files that appertain to each document checked by the Inprovio DPS software.
The “Checked-Documents” directory is where documents that have been check by the Inprovio DPS software are deposited.
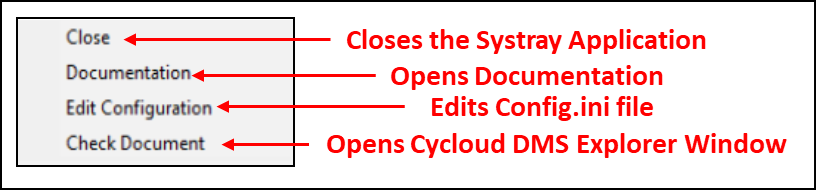
The last task is to install the systray helper application that appears in the systray and provides a number of options to aid the user when they are using the software.

After all tasks have been executed the Inprovio DPS software will open and an explorer window will be displayed as the following diagram shows.
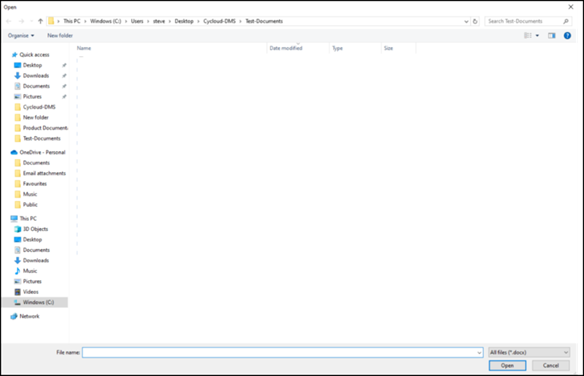
It is important to note that the default directory that is used (unless explicitly configured in the config.ini) is the “Test-Documents” within the installation directory.
Configuration
Configuration of the Inprovio DPS software is straightforward. All configurable features are represented in the “Config.ini” file located in the installation directory. The critical configuration information would have been completed in the previous section however there are many other configurable items available.
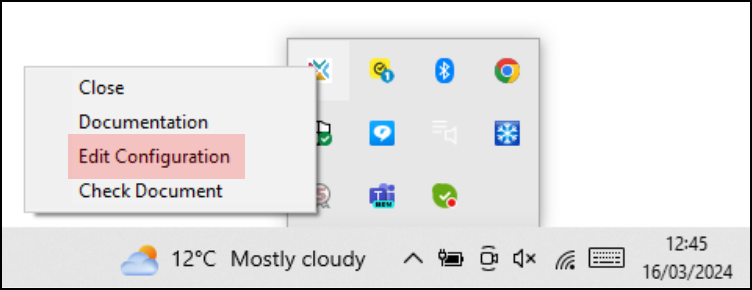
In order to open the config.ini file it is advised that the Inprovio DPS systray application is used. This systray application is installed the first time the Inprovio DPS software is run and persists within the Windows session (Unless it is unloaded) until a reboot.
Right clicking on the Inprovio DPS systray application displays the various options that are available one of which is “Edit Configuration”. Selecting this option executes notepad and loads the “config.ini” within the installation directory.
Each of the “config.ini” file options are explained in the “Documentation.txt” file located in the installation directory. Each option can be altered to reflect the users desired requirements. It is important to note that the “config.ini” file is read by the “Inprovio-DPS.exe” file each time it is executed so changes to the “config.ini” file are not dynamic so will only be effective after the “config.ini” file is saved with the new configuration and the “Inprovio-DPS.exe” file is run.
| Configuration Option | Default Value | Explanation |
| OpenAI_Key | Blank | This is the API key obtained in step 1c. An API or Application Programming Interface key, is a unique identifier used to authenticate and control access to an API (Application Programming Interface). |
| AITemp | 0.0 | Temperature serves to regulate the level of randomness and creativity in the generated text by adjusting the probabilities of token selection during the generation process. The default setting is the optimum and should not be changed. |
| AILanguage | English United Kingdom | This is the language that the AI will use to return data. Supported settings are as follows. English United Kingdom English US |
| OpenAIServiceName | Blank | This is the name of the OpenAI service created in step 1c. The OpenAIServiceName denominates the service that the Inprovio DPS software will use. |
| OpenAIDeploymentName | Blank | This is the name of the OpenAI deployment created in step 1d. The OpenAIDeploymentName denominates the deployment that the Inprovio DPS software will use. |
| CustomerNumber | Blank | This is the customer number that you will have been assigned from Inprovio directly or one of inprovio’s authorised partners. |
| LicenseKey | Blank | This is the licence key that you will have been assigned from Inprovio directly or one of inprovio’s authorised partners. |
| OpenAIAPIVersion | 2023-09-15-preview | This is the Large Language Model (LLM) that is being used by the Inprovio DPS software. This may change as later models are released. |
| OpenAIPromptTokensCost | Blank | This is the cost of “prompt” tokens. This cost is included in the return form presented to the user each time the Inprovio DPS software checks a document. |
| OpenAICompetionTokensCost | Blank | This is the cost of “completion” tokens. This cost is included in the return form presented to the user each time the Inprovio DPS software checks a document. |
| OpenAIReturnCost | True | This is the setting that enables the display of cost information in the return form. A setting of “False” would disable the feature. This setting is also dependant on the “OpenAIPromptTokensCost”, “OpenAIPromptTokensCost” and “OpenAIReturnCostCurrency” settings having a value. |
| OpenAIReturnCostCurrency | £ | This is the currency identifier displayed in the cost information form. Supported settings are as follows. £ or $ |
| OpenAIStyleGuide | Blank | This sets a style guide. A style guide is a set of standards and guidelines that governs the use of language, grammar, punctuation, formatting, and stylistic elements in written communication. Style guides are commonly used by writers, editors, publishers, and organizations to ensure consistency, clarity, and professionalism in their written content. This is currently not supported at the moment but is expected in future releases. |
| DocOpeningDir | Blank | This is the initial opening directory for the selection of files; however, the default opening directory will be the “Test-Documents” directory in the installation directory until the setting is configured with a valid directory name. Supported settings are as follows. “Blank” or “<A valid directory path>”. |
| DocSaveDir | Blank | This is the setting used for the document save directory however the default save directory will be the “Checked-Documents” directory in the installation directory until the setting is configured with a valid directory name. If a valid directory is specified then checked documents will be saved in that specified directory however if the configured directory is not valid or the setting is set to False or left blank then the documents will be saved in the Checked-Documents directory in the installation directory. Supported settings are as follows. “Blank” or “<A valid directory path>”. |
| DocCheckEnabled | True | This is the setting for enabling the checking of documents by the Inprovio DPS software. Supported settings are as follows. “True” or “False”. |
| TextHightlighting | False | This is the setting that highlights the text within a bookmark allowing for better visibility of text that has been checked. |
| DocVisibility | True | This setting either makes the document visible while it is being checked or invisible. If document visibility is set to invisible then a wait screen will be displayed. Supported settings are as follows. “True” or “False”. |
| DocSaveAsDocx | True | This setting saves a copy of the original document with the changes that the AI had made in the directory specified in the DocSaveDir option. Supported settings are as follows. “True” or “False”. |
| DocSaveAsPDF | True | This setting saves a copy of the original document as a PDF file in the directory specified in the DocSaveDir option. Valid settings are “True” or “False”. Supported settings are as follows. “True” or “False”. |
| DocClose | True | This setting enables the closure of the original document. Supported settings are as follows. “True” or “False”. |
| DocFontName | Calibri | This setting sets the font that the document is edited with. If no font is configured and the setting left blank then the document will be edited in its original font. Supported settings are as follows. Name of the font or “Blank”. |
| DocFontColour | Blank | This setting sets the font colour that the document is edited with. An example setting would be “000000” which is the HEX code that represents the colour black. If left blank the document would be edited using its original font colour. Supported settings are as follows. Colour of the font using its associate HEX code or “Blank”. |
| DocCheckSpeed | 0000 | This setting sets the speed that the document is checked. This setting is in units of milliseconds and is used as a pause between each sentence that is sent to the AI service. Supported settings are as follows. Number of milliseconds from “0000” – “9999”. |
| TextHighlighting | False | This setting highlights the text within a bookmark ensuring that the visibility of the text is easier to read after the document has been checked. This ensures that the reader can easily see the text that has been checked by the AI service. |
| ExceptionTextHighlightingColour | Turquoise | This setting sets the colour of text highlighted for exceptional consideration. This setting is not used at the moment and is for future use. Supported settings are as follows. “Yellow”, “Red”, “Blue”, “BrightGreen”, “Pink”, “Turquoise”, “DarkRed”, “DarkBlue”, “DarkYellow”, “Violet”. |
| LicNotify | True | This setting enables or disables license notifications. Notifications are sent to the user when the Inprovio DPS software is executed if the license has less than 7 days left before coming invalid. Supported settings are as follows. “True” or “False”. |
| SysTraySupport | True | This setting enables or disables the systray application. The systray application is installed when the Inprovio DPS software is executed. Valid settings are “True” or “False”. |
| SendToSupport | True | This setting is not used at this time. |
| SplashScreen | True | This setting enables or disables the splash screen when the Inprovio DPS software is executed. Supported settings are as follows. “True” or “False”. |
| EnableUpdates | True | This setting enables or disables updates. Supported settings are as follows. “True” or “False”. |
| EULAAgreed | Blank | This setting is a system setting that represents the acceptance of the Inprovio EULA. It is set to “True” when the user accepts the Inprovio EULA when the Inprovio DPS software is executed for the first time in step 3. |
Operational Use
Executing the software
Inprovio DPS has been designed to be easy to use. All that is required to load the software is to execute the “Inprovio-DPS.exe “executable file located in the installation directory (There are a number of ways to do this, either by double clicking the file in an explorer window or by selecting the “Check Document” option presented from the systray application in the systray). This will result in an Explorer Window being presented to the user which in turn displays word documents in the directory specified within the “config.ini” file.
Document Bookmarks
Inprovio DPS can be used on any documents that are created in Microsoft Word however in order to know what parts of the document are to be analysed and subjected to spelling and grammar checking extensive use of bookmarks are used. Without bookmarks Inprovio DPS is unable to check any text.
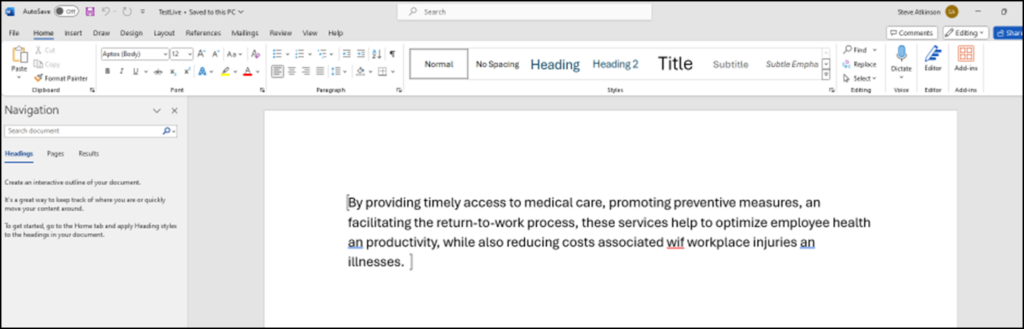
Block bookmarks allow Inprovio DPS to identify the text within them as text that the user requires to be checked. For example the following diagram shows a word document with a paragraph that has been bookmarked. This can been seen by the grey “[” and “]” characters present at the start and end of the paragraph.
There is no practical limit to the number of bookmarks that can be added to a document so Inprovio DPS is able to check large documents.
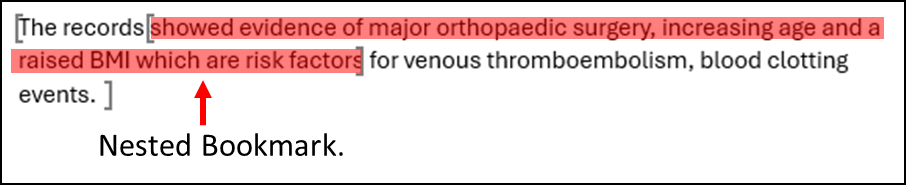
It is important to note that nested bookmarks are not supported. Nested bookmarks are bookmarks that are placed within bookmarks.
An example of a nested bookmark placement is as follows.
Show Bookmarks
In order to see the bookmarks within word it is necessary to ensure that bookmarks are visible as this is not set by default. This can be set by going to advanced options within word and simply turning them on. This is very helpful as being able to see the block bookmark is much easier for the user.

Bookmark Order of Processing
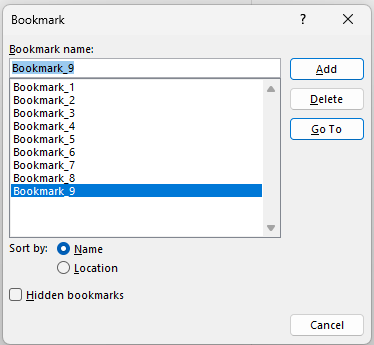
Inprovio DPS checks the text held between block bookmarks and processes them in the order the bookmarks appear in the bookmark form within word as below. The order runs from top to bottom and seems to be reliant on the naming convention of the bookmark so thought is required should sequential numbering be required.
Bookmark Placement
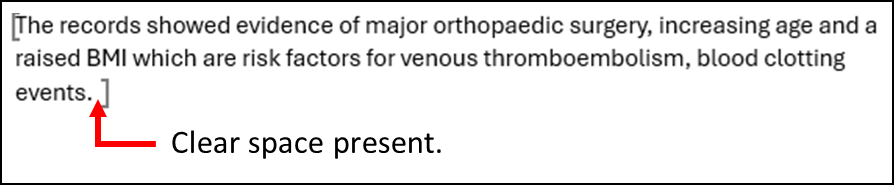
The placement of bookmarks are important to ensure that the text held within them is clearly identified. This is achieved by ensuring that the text is separated from the trailing bookmark.
An example of a correctly placed bookmark is as follows. Note there is a clear space separating the text from the trailing bookmark.
An example of the same paragraph but with an incorrectly placed bookmark is as follows. Note that there is no space separating the text from trailing bookmark.

Selecting a document
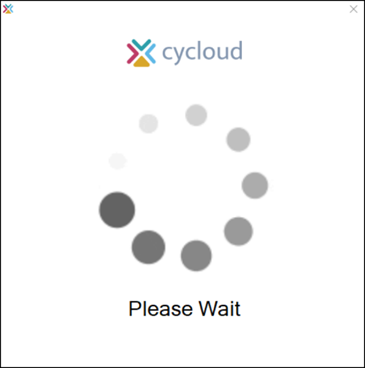
Selecting a word document will run the Inprovio DPS software and spelling and grammar checking with be performed using AI. By default, the document will be visible whist the software performs the spelling and grammar checking but this is configurable by the “DocVisibility” option within the “config.ini” file. Should this not be required then the setting would simply be set to “False”. It is important to note that Inprovio DPS does not edit the original document at any point so this document will remain in its original state and location. It is important to note that if the document is not displayed while checking is being executed a form similar to the following will be displayed to the user indicating that the Inprovio DPS software is working and checking the selected document. The form will be closed when the Inprovio DPS software has completed the checking of the document.
Saving a document
Edited documents will be saved to the specified directory configured in the “config.ini” file as either Docx, .PDF or both formats depending on the configuration of the “config.ini” file. The setting options that are responsible for what format the file is saved in are the “DocSaveAsDocx” and “DocSaveAsPDF” options.
Document Checking Speed
The speed that the Inprovio DPS software checks the selected document is controlled by the “DocCheckSpeed” option in the config.sys file. This setting denotes the pause between each sentence being checked. This is useful should the checking of the document need to be observed while the checking was performed.
User Interface
There is no user interface as such to the Inprovio DPS software other than the systray application. This application provides everything that maybe required from a user perspective so users are encouraged to look at the options available from this application and use them accordingly. Options available at time of writing are as follows.