- Overview
- Resources and Information Required
- Completed Cycloud Product Installation
- Cycloud License
- Completed Cycloud Controller Installation
- Supported virtualisation technologies
- Information Required
- Installation Process and Flow
- Running the Cycloud Agent Installer
- Supported Operating Systems
- Image Creation Process
Overview
The Cycloud Agent Installer automates various steps required to install the Cycloud “Agent Service”.
The Cycloud Agent Service is an optimised Windows scheduled task that provides operational logic for all aspects of Cycloud Agent services. These include tasks required to ensure operational delivery of Windows applications and operating system functionality to users and the ongoing orchestration of Cycloud provisioning and deprovisioning tasks.
Both Citrix (Virtual Apps and Desktops) and Microsoft (AVD) virtualisation technologies are supported and it is assumed that there is a fully functional Citrix or Microsoft AVD infrastructure in place.
There are several technical pre-requisites that are required prior to beginning the installation and this document will explain these in detail.
It is strongly advised that the required information is at hand prior to beginning the installation to prevent any confusion that may terminate the installation. Again, this document will highlight the required information and where it can be obtained.
Resources and Information Required
Completed Cycloud Product Installation
The Cycloud “Product Installation” should have been completed prior to running the Cycloud controller installer. Details can be found at this link. This would have registered Cycloud with Azure and also setup the Cycloud Data Store both of which are crucial for the Cycloud controller to be able to work.
Cycloud License
A valid Cycloud license should be added to the Cycloud Data Store. This would have been added using the Cycloud Control Centre interface. Details can be found at this link.
Completed Cycloud Controller Installation
At least one Cycloud Controller must have been installed and configured. Details can be found at this link. Cycloud Controllers provide scheduling of provisioning and deprovisioning tasks.
Supported virtualisation technologies
If using Microsoft AVD then the “Spring” release or later should be used. Releases prior to this are not supported.
If Citrix Virtual Apps and Desktops is being used then releases up to 1912 LTSR are supported. Versions released after 1912 LTSR are not supported.
Information Required
The Cycloud user account credentials will be required during the Cycloud controller installation. This would have been setup during the installation of the Cycloud product installation and provides the account that the Cycloud controller scheduled tasks runs under.
Cycloud Data Store Path
The path to the Cycloud data store is required during the Cycloud controller installation. This should be in UNC format. An example is as follows.
Example: <\\ServerName\ShareName>
Installation Process and Flow
The following diagram shows the full Cycloud installation process. For the rest of this document, we will be focusing on the Cycloud Agent Installer.
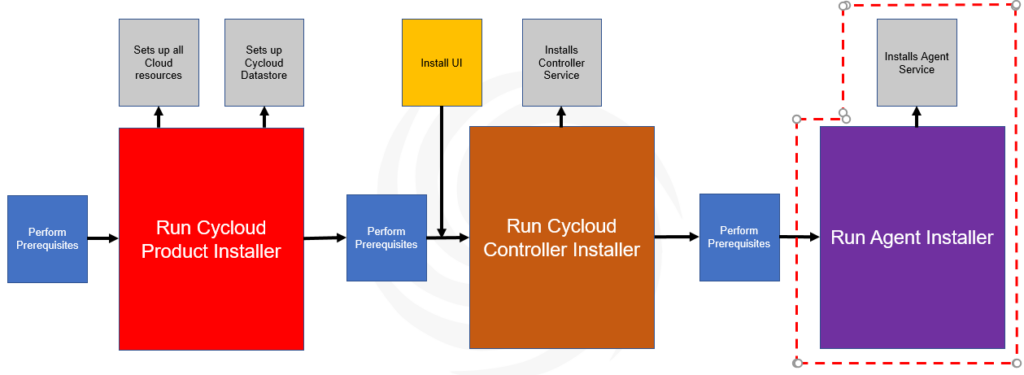
The Cycloud Agent Installer installs a number of components required to ready a Windows machine for provisioning using Cycloud technologies. The installation process is a relatively simple wizard driven process that can be completed quickly and easily.
Running the Cycloud Agent Installer
Installing the Cycloud Agent is part of a process. This document outlines in detail this process and provides the correct running order of the steps required.
Supported Operating Systems
The Cycloud Product Installer can be run on any machine running a supported Microsoft Windows operating system. Supported operating systems are as follows.
- Windows Server 2016 (All Editions)
- Windows Server 2019 (All Editions)
- Windows Server 2022 (All Editions)
- Windows 10 (All versions)
- Windows 11 (All Versions)
Image Creation Process
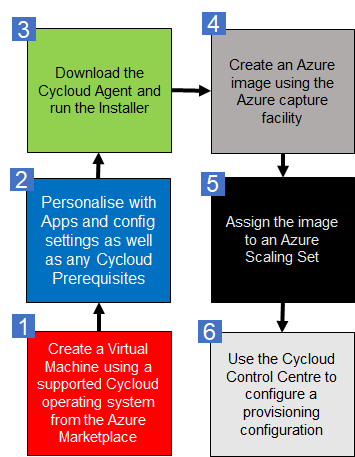
It is important to note that the Cycloud Agent has been designed to install onto a “gold image”. A gold image is a centrally stored copy of a virtual machine image that is used for replication purposes and to deploy working virtual machines to users. There are many steps to creating a gold image and these may be specific to each deployment and user case however the following steps (although high level and simplified) are specific to Cycloud’s requirements and reflect a generalised version of events that will provide the bases of the process used in this guide.
Let’s look at each of these steps in detail. Although there is no foreseen reason that “custom images” would not work with Cycloud, for the purposes of this document it is assumed that virtual machines are going to be created from images available though the Azure Market Place.
Step 1
Creating a virtual machine is a simple process. The following articles should assist in this task.
Quick Guide Create VM with Azure
Step 2
A gold image typically contains applications and specific settings required by the administrator for users and system specific various purposes. As gold images are replicated and could be used by any number of users it is crucial that any aspect of the software and settings installed do not hold any unique data or configuration that is specific to any specific users or machines. There maybe special considerations on an application by application basis so please consult the software vendors recommendations.
Prerequisite Components
There are a number of components that are required to be installed prior to running the Cycloud Agent Installer. These components and installation processes can be automated by use of the Cycloud Primer utility.
Domain Join
During the installation process of the Cycloud Agent various information is collected. This information is saved to the Cycloud Datastore and used to provision each machine. An important piece of information is the Microsoft Domain that the provisioned machines will be assigned. In order for this to be effectively recorded (Along with other aspects of the Domain) it is necessary for the machine to be Domain joined. The following article explains this process.
Join a Computer to a Microsoft Domain
The Active Directory location of the machine will be also be recorded and stored in the Cycloud Datastore. This information is used as the location for subsequent provisioned machines so it is important that the gold image is made a member of the correct OU prior to configuring the Cycloud Agent.
The following link provides useful information regarding Active Directory and organisational unit design.
Creating an Organizational Unit Design
Microsoft Updates
Microsoft Updates should also be considered. Updates to the operating system can negatively impact the provisioning of machines if they occur during the provisioning process. It is common practice when working with creating a gold image to turn off any automatic update processes for the operating system and any applications. This can be achieved within the gold image or set this by group policy. The process for disabling Microsoft updates is operating system specific so consult the documentation for the operating system that is being used. Application vendors should be consulted regarding the updating process of their software.
It is a Cycloud recommendation that updates should be applied periodically to the gold image and then rolled out using the process explained in the remainder of this document.
A host pool setup for validation environment is particularly useful for staging updates and other changes to the gold image. Details can be found in the following article.
Create a host pool to validate service updates
Cycloud Agent Updates
Cycloud Agent Updates are performed automatically. As part of the Cycloud Agent Service’s operational functions checks are carried out to potentially update the Cycloud Agent every time a Cycloud Agent machine is booted. On every boot a comparison is carried out between the version of Agent file held in the Cycloud Datastore and the version that is running on the Cycloud Agent machine. If the version of the files held in the Cycloud Datastore are different to that held on the Cycloud Agent machine then copies of the version held in the Cycloud Datastore will be copied down to the Cycloud Agent and used. There is no Administrative intervention required for this process.
If an upgrade is carried out then an entry is logged to the Cycloud Agent event log on that particular Cycloud Agent machine and a copy of the previous files are stored in the $env:ProgramFiles\Cycloud directory.
It is important to note that this process will upgrade or downgrade crucial Cycloud Agent files as it is simply a comparison that is performed. This allow the administrator to control the versions of Cycloud Agent software running on Cycloud Agents.
Unrestricted Internet Access
As much of the software required have sources on various Internet repositories it is essential that the machine is able to connect to these repositories over the Internet. There maybe considerations around network routing, proxies and VLAN configuration although these are unlikely if standard Azure Marketplace images are being used with simple networking configuration however if for any reason this isn’t the case then this will need to be considered on a case by case basis.
Local Network Access to the Cycloud Datastore
The Cycloud Datastore is central to all Cycloud operations and as such needs needs connectivity from the gold image prior to installing the Cycloud Agent software. As the Cycloud Datastore is simply a Microsoft share this is a simple process. Microsoft shares require authentication so it is essential that the user installing the Cycloud Agent software has the permissions to read and write information to the Cycloud Datastore.
Step 3
At this point the machine is ready to install the Cycloud Agent software.
Download, unzip and save the Cycloud Agent software to a local directory on the machine. Run the “Cycloud-Agent-Install.exe” installation file. The Cycloud product software can be downloaded from the Cycloud download page at this link.
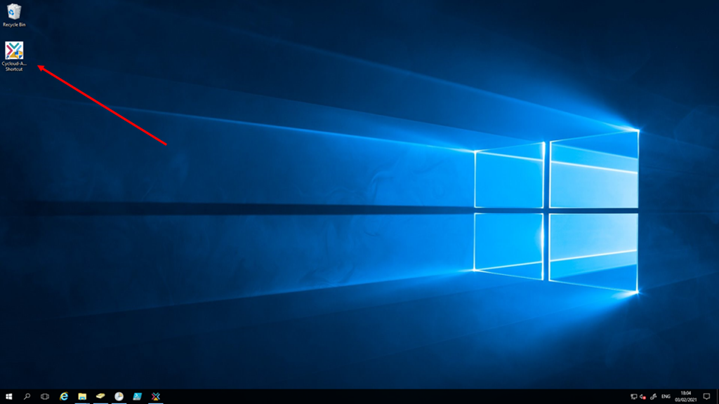
During the installation of the Cycloud Agent software a shortcut is placed onto the users desktop. This shortcut can be used to run the Cycloud Agent installation at any time. This is optional however this shortcut is removed at the end of the Cycloud Agent installation prior to Sysprep being executed which is covered later in this section.
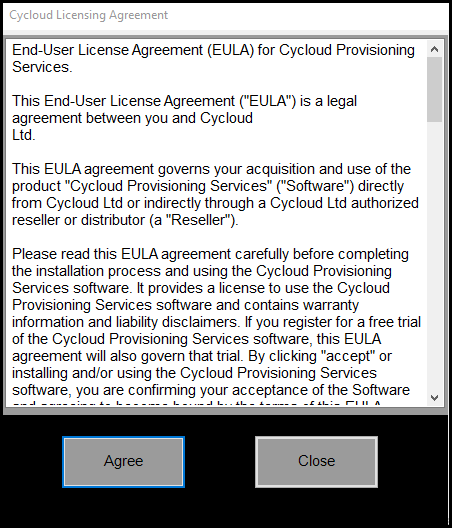
The first thing that is required is to read and accept the Cycloud EULA. The installation will not continue until the EULA is agreed.
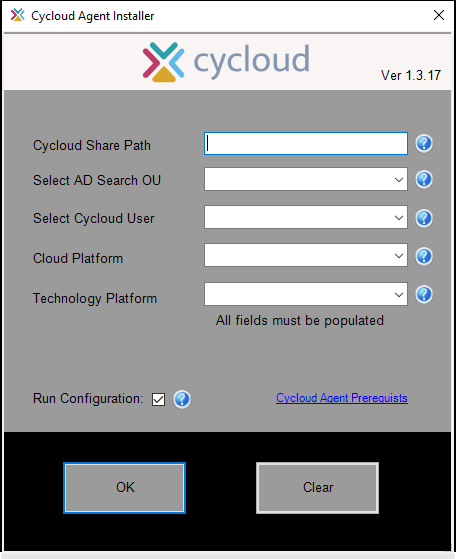
The next form askes for some crucial information to allow the Cycloud Agent to connect to the Cycloud Datastore, Active Directory and Azure infrastructures. We will look at each of these fields in the remainder of this section.
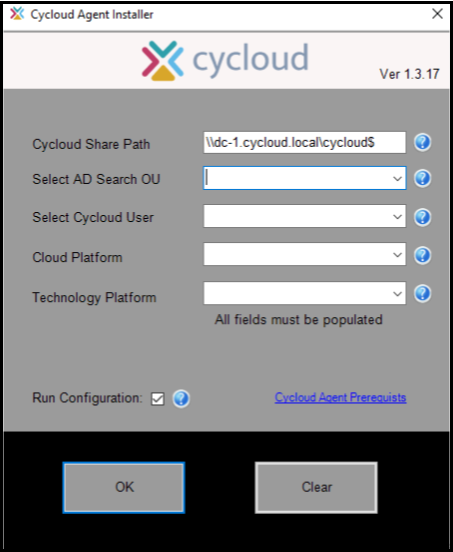
The first field provides the UNC path to the Cycloud Datastore. It is important to enter the Server name as a fully qualified domain name as in the example screenshot above. There are a number of technical reasons for this and the installation will not allow the user to continue until a valid share is found using the provided FQDN of the Server hosting the Cycloud Datastore. The help bubble by the side of each field explains more about each field and what data to enter.

The second field enumerates OUs and containers in Active Directory. This will in turn populate the following field with users existing in the selected OU which should include the Cycloud User. The Cycloud user would have been created when the Cycloud Product Installer was completed. You can get more information at the following link. Cycloud Product Installation
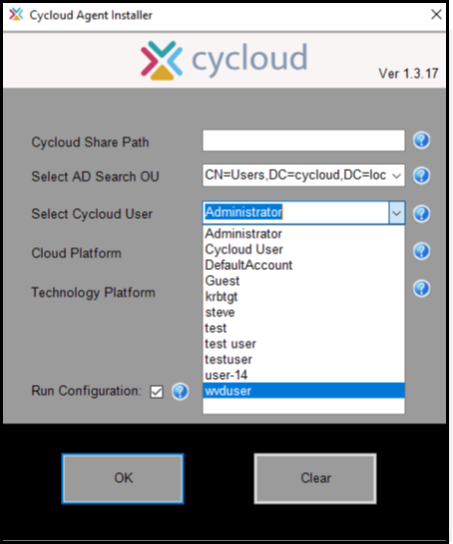
The Cycloud User can now be selected from the “Select Cycloud User” field.
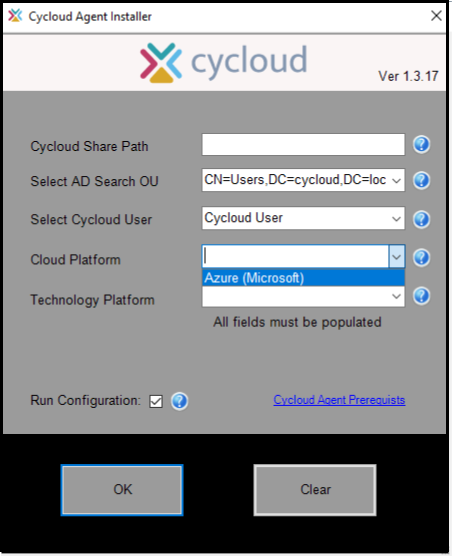
In the 1.3.17 release the “Cloud Platform” support is limited to Microsoft Azure so this can be selected however support for other cloud platforms may be supported in later releases.
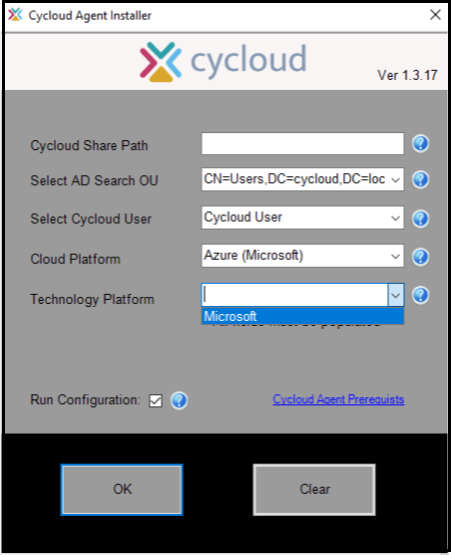
In the 1.3.17 release the “Technology Platform” support is limited to Microsoft (AVD) and Citrix so either of these technologies can be selected however support for further technology platforms will be considered for later releases.

Once all the fields have been populated (This is a mandatory requirement) the form is then ready to be submitted by selecting the ok button which would complete the installation stage of the Cycloud Agent however a decision is required whether to run the configuration of the Cycloud Agent at this point. This can be achieved by checking the “Run Configuration” check box.
There are reasons as to why the Cycloud Agent may need to be installed but not configured. One reason is that it may not have been decided as to what host pools (if using AVD) or delivery groups (if using Citrix Virtual Apps and Desktops) the agent is to be assigned but installing the Cycloud Agent can be completed as this would reduce the need to do this later in the process.
Assuming that the “Run Configuration” check box was selected the following form will be presented after submission. Note that in this example AVD has been selected so the Azure Resource Group and Host Pools are enumerated. If Citrix was selected then Citrix Machine Catalogues and Delivery Groups would be shown.
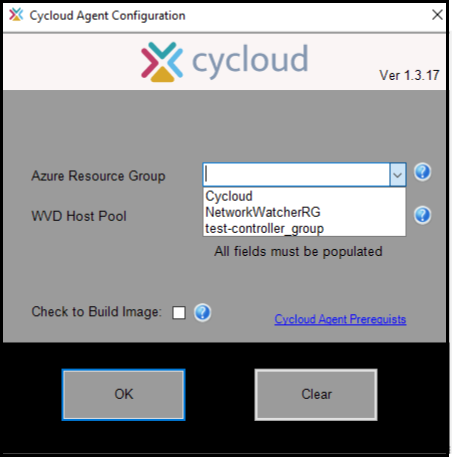
In the case of Microsoft AVD as host pools can exist in many different Azure resource groups the first field allows the user to select the Azure resource group they want to browse for the host pool. This is not the same in respect of Citrix Virtual Apps and Desktops as there are no links between Machine Catalogues and Delivery Groups
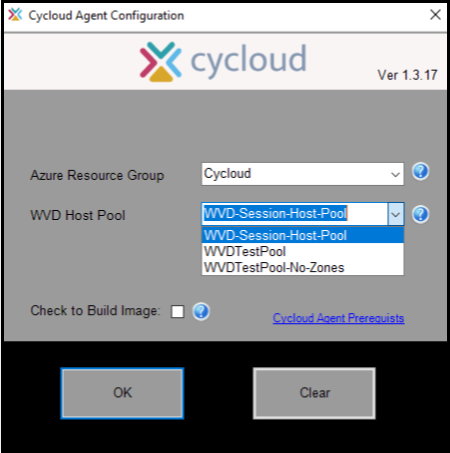
The second field displays the available host pools (in the case of AVD) or Delivery Groups (in the case of Citrix Virtual Apps and Desktops). The host pool or Deliver Group selected is where machines are placed from this gold image.
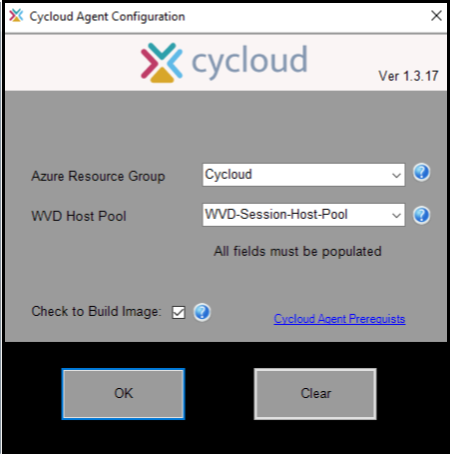
When all fields are populated (This is a mandatory requirement) the form can be submitted. There is a further decision to be made regarding the “Check to Build Image” check box. Checking this box will enter the last step of the process by making the machine ready for Azure imaging and ready for deployment.
When the form is submitted (if there is no existing configuration found) a configuration is created in the Cycloud datastore. The configuration will contain the information selected during the Cycloud Agent configuration process as well as other information required to provision and deprovision machines.
Even at this point the Cycloud Agent can be installed and configured without being made into an image. This maybe appropriate in order to add further applications or configuration details at a later date.
Assuming that the “Check to Build Image” check box was selected the following form will be presented after submission.
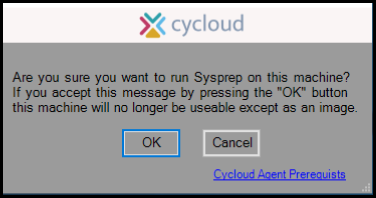
This is the very last point at which the user can abort a “Sysprep”. If ok is selected at this point it will render the machine usable as a working machine so beyond this point the machine will only be useable for creating an image.
Sysprep is required to be run before an image can be created. It is important to only run Sysprep from the Cycloud Agent installer. This is because the Cycloud Agent installation software performs a number of additional tasks.
Step 4
After Sysprep has been run in step 3 the machine will have been generalized and closed down. The machines active directory machine object is also removed. It is now ready to be made into an Azure managed image. This process is relatively simple and can be achieved in a number of ways.
The following links may be useful to gain more detailed information regarding Sysprep and Azure imaging requirements.
Creating a managed image of a generalized VM in Azure
Create a VM from a managed image
Step 5
The next step involves the assignment of the image created in step 4 to a Microsoft Scaling Set. Scaling sets allow automatic scaling of virtual machines and provide flexibility and cost management. Cycloud makes extensive use of scaling sets and leverages many of the functions they provide. The creation of a scaling set is required for both Microsoft AVD and Citrix systems.
In this section we will look at creating a scaling set ready to accept the machine image. The following links maybe useful as a general overview for scaling sets as it is advised that a high level understanding of their capabilities is obtained.
Features and Benefits of Scale Sets
For the rest of this section we are assuming that no scaling sets have been created. There are many ways that scaling sets can be created however we will use the Azure Portal for this example as this allows us to explain some of the considerations necessary for Cycloud.
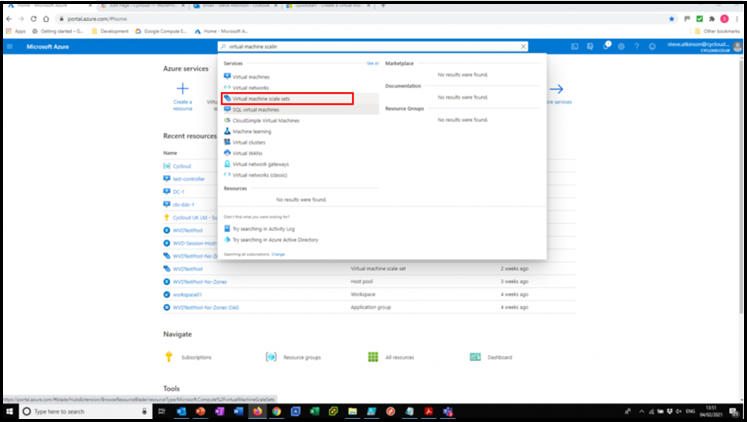
Scaling sets can be administered and created by navigating to “Virtual Machine Scaling Sets” in the Azure Portal. This can be achieved by searching within the portal for “Virtual Machine Scaling Sets”.
Creating a scaling set is performed by using a familiar wizard driven process and is explained in some detail in this quick start article.
Create a virtual machine scale set in the Azure
To ensure that both scalability and resilience of service are the best available Cycloud supports only regions with “three” availability zones. It
is important to note that not all Azure regions have this facility so the following links can be used to determine supported Cycloud regions.
Availability Zones and Regions
Cycloud will work with scaling sets created in any region and does not rely on availability zones. It is however advisable to choose regions that have availability zones to improved resilience and increase availability of the service. It is important to note that not all Azure regions have this facility so the following links can be used to determine supported Cycloud regions.
Availability Zones and Regions
There are also some further considerations to the region chosen for the scaling set which are outside the scope of this document however a useful article can be viewed at the following link.
Generally vnets that are setup in a particular region cannot communicate with subnets residing in other regions. This can be configured by the introduction of VNet-to-VNet configuration if required and is explained in the following article.
Connecting Virtual Networks in Azure across Different Regions
Special considerations for scaling sets specific for Cycloud are as follows.
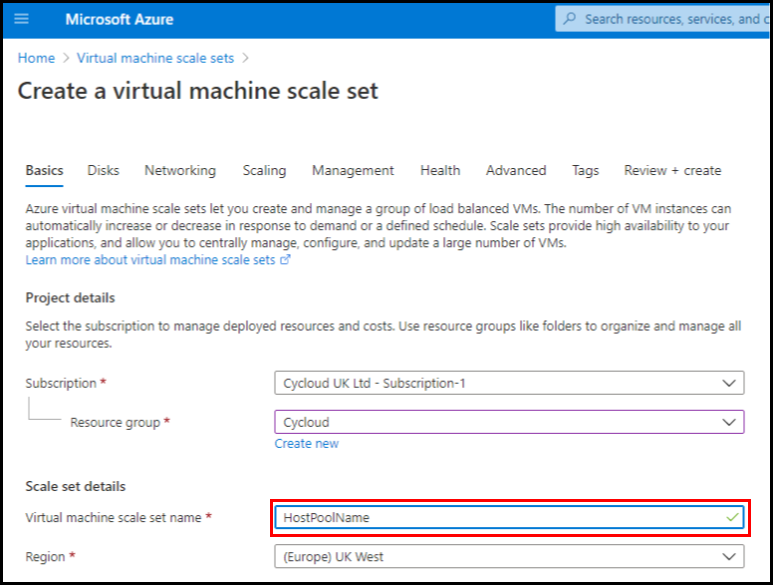
The name of the scaling set must match perfectly the name of the AVD Host Pool that is it to serve or if using Citrix the Delivery Group. This is a crucial requirement as the Cycloud Controller uses the name of the scaling set to align it with the AVD host pool or Citrix Delivery Group to which it is to deploy machines to. It is important to note that the name of a scaling set cannot be changed after it has been created. If this is a requirement then the scaling set would need to be deleted and recreated.
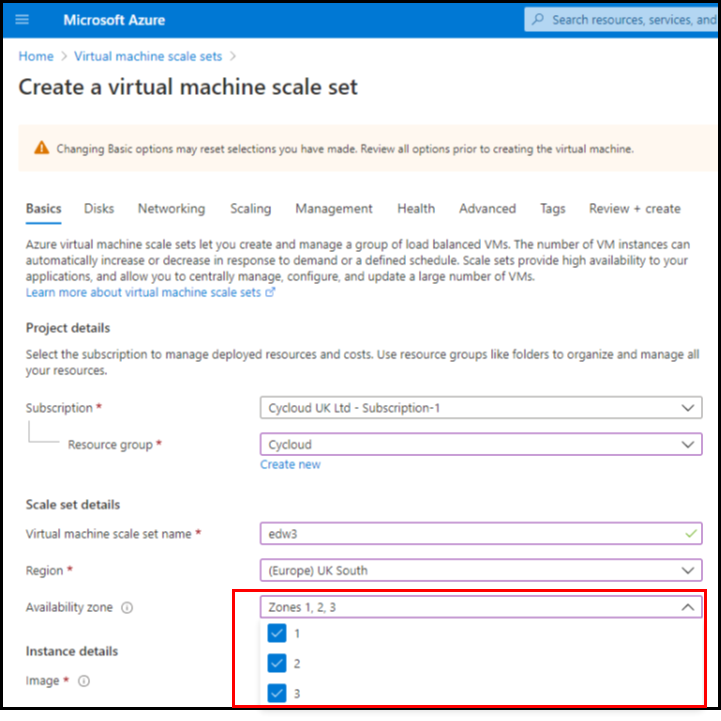
Availability Zones: As previously discussed are not available in all regions however it is a Cycloud recommendation that wherever possible regions which contain availability zones be chosen for production systems. Regions without availability zone are perfectly acceptable for testing environments.
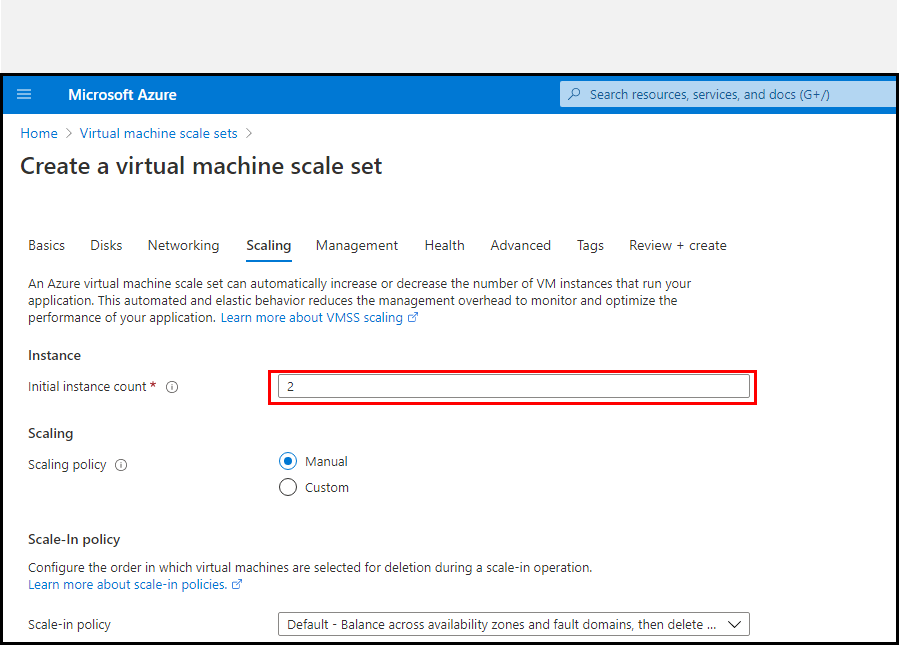
Initial Instance Scaling: By default. scaling sets are created with this setting set to “2”. This should be set to “0” to allow the scaling set to be emptied entirely of machines. This setting cannot be changed after the scaling set has been created.
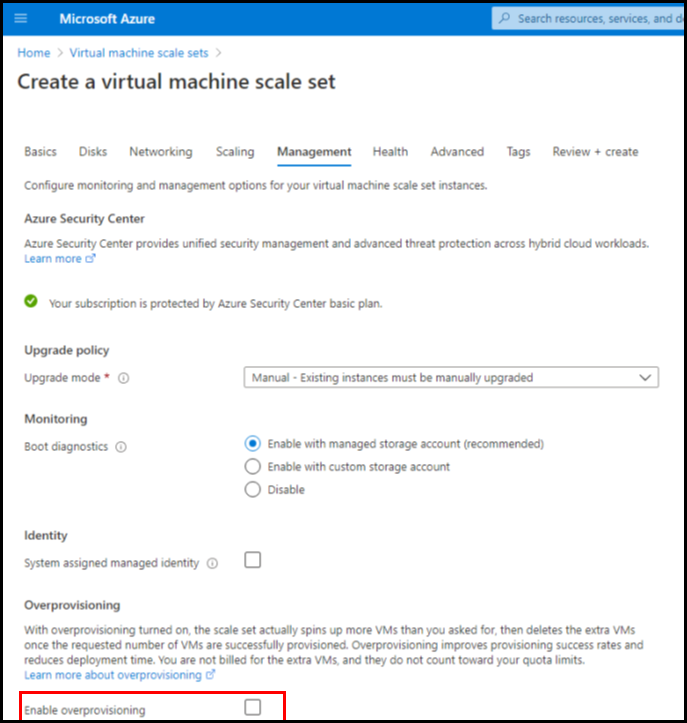
Overprovisioning: By default, scaling sets are created with this setting enabled. This setting should be disabled to allow the Cycloud Controller to control the provisioning of machines. Overprovisioning is not compatible with the Cycloud provisioning methodology.
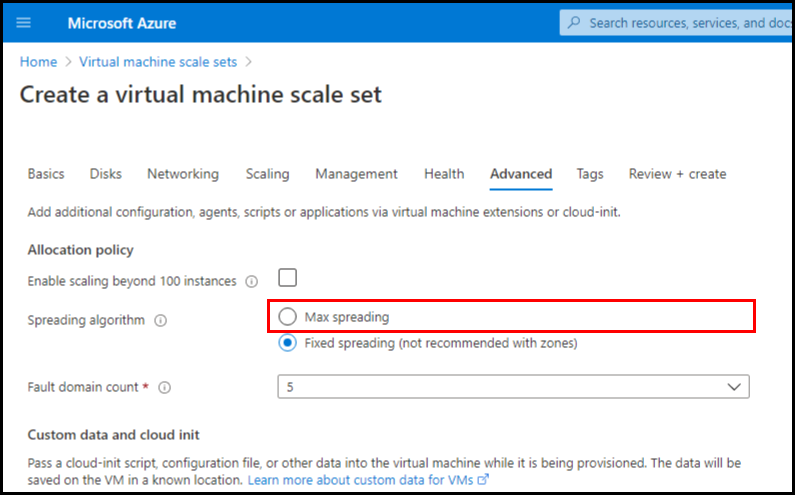
Spreading Algorithm: By default, scaling sets are created with this setting set to “Fixed spreading”. As stated this is not recommended if the scaling set has been configured to use zones however it is a Cycloud recommendation that this setting be set to “Max spreading” regardless if zones are being used or not. The reason for this is that it will ensure that machines are provisioned regardless of the number of fault domains available.
Assigning the image created earlier can be done at the time the scaling set is created or assigned to an existing scale set. It is not possible to use the Azure Portal to assign an image to an existing scaling set unless the image was published to a gallery. The following article provides an overview of image galleries
Shared Image Galleries overview
PowerShell can be used to assign the image to an existing scaling set by using the “Update-AzVmss” cmdlet. The “Update-AzVmss” cmdlet is part of the Az PowerShell module so this needs to be installed. This software can be downloaded from the Cycloud downloads page. Simply install the MSI and run the following PowerShell script after altering the variables to reflect your requirements.
Connect-Azaccount
$AzImageName = <‘Image Name’>
$AzResourcegroupName = <‘Resource Group Name’>
$AzVMScaleSetName = <‘Scale Set Name’>
Update-AzVmss -ResourceGroupName $AzResourceGroupname -VMScaleSetName $AzVMScaleSetName -ImageReferenceId (get-azimage -ImageName $AzImagename).id
More information on the Update-AzVmss cmdlet can be found at this link.
Step 6
Now that an image has been created and assigned to a scaling set the Cycloud Control Centre can be used to configure provisioning schedules.
Please consult the Cycloud Administrators Guide following documents for further information.