- Overview
- Cycloud Control Centre
- Help and Assistance
- License Configuration
- Cycloud Datastore Location
- Image Configuration
- Scheduled Provisioning Settings
- Scheduled Provisioning Enabled
- Schedule Repeat
- Exclude Weekends
- Performance Settings
- Disk Performance
- Memory Available
- Processor Utilisation
- Sample Rate
- Sample Period
- Performance data sampling example
- Performance User Messaging
- Robotic Provisioning Settings
- Robotic Provisoning Start Time
- Robotic Provisoning End Time
- Robotic Deprovisioning Start Time
- Robotic Deprovisioning End Time
- The last stage of the Cycloud Control Centre
- Enable Deprovisioning Messaging
- User Retention
Overview
This administrators guide relies on all Cycloud components being installed and working in accordance with the various Cycloud installation guides etc.
As Cycloud (once installed) is extremely low in terms of maintenance this guild focuses on the Cycloud Control Centre and how configure image settings to reflect business requirements.
Cycloud Control Centre
The Cycloud Control Centre is the administrative interface used to configure all aspects of provisioning from adding licenses to configuring provisioning and deprovisioning schedules. The interface has been designed to be as simple and efficient as possible.
Help and Assistance
Throughout the various interfaces help is always on hand by way of help bubbles next to each control represented by this icon.![]() Each help bubble will reveal appropriate information pertaining to the feature selected.
Each help bubble will reveal appropriate information pertaining to the feature selected.
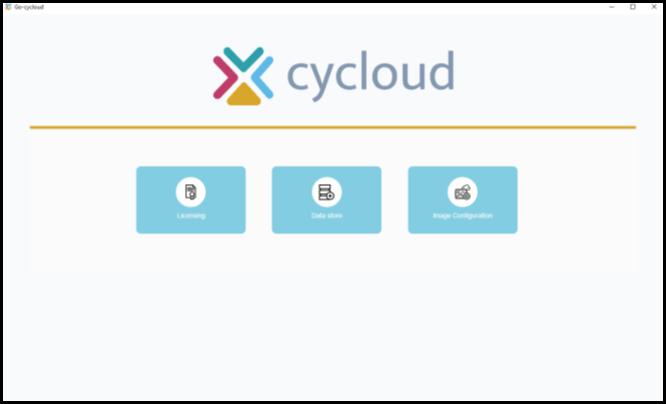
When the Cycloud Control Centre is opened the application will default by displaying the home screen. There will be a number of tiles offering the user high level options including “Licensing”, “Datastore” and “Image Configuration”.
License Configuration
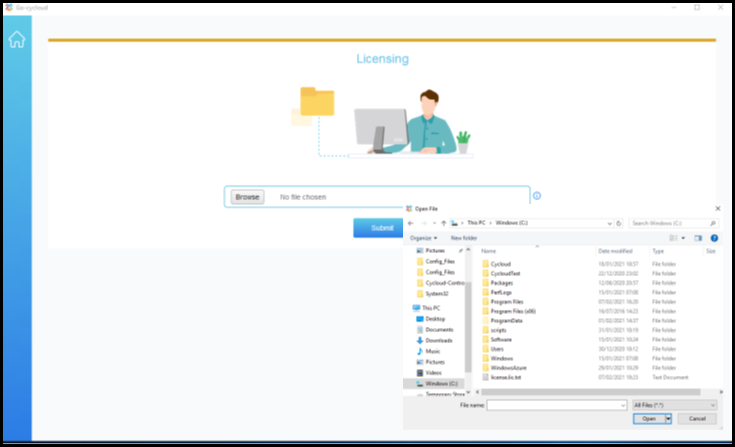
Opening the licensing tile provided a means of searching for a Cycloud license file by using the browse button and submitting it to the Cycloud datastore. Cycloud licenses can be obtained though authorised Cycloud resellers. The home icon (Always displayed in the left hand pane at the top of the interface) will always navigate the user to the highest level within the interface.
Cycloud Datastore Location
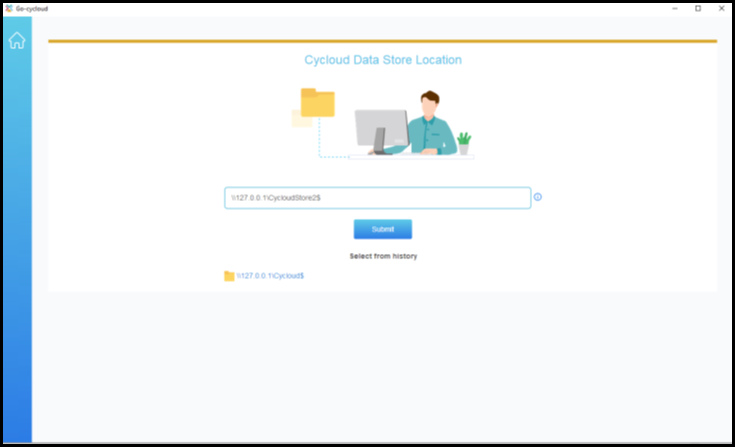
Opening the Datastore tile provides a means of connecting the Cycloud Control Centre to a Cycloud Datastore. Multiple datastores are supported but it is important to note that configurations from only one datastore at a time are enumerated. The datastore can be changed at any time using this interface.
Image Configuration
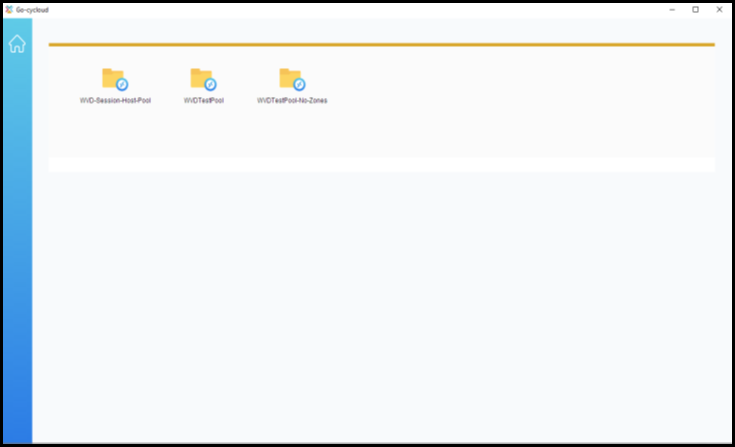
Opening the “Image Configuration” tile provides access to the configurations which have been created. Configuration are created when the Cycloud Agent is installed and configured. Details can be found at this link.
Selecting any of the configuration tiles will provide a means of changing any of the configuration items pertaining to the relevant configuration and enters a wizard driven process. Each stage of the process is represented by its own tile at the top of the page. It is important to note that although there is a logical order of the process (Starting from left to right) it is not mandatory to follow this order. Administrator can jump to which ever part of the process (by selecting the step required from the top of the page) they want to reconfigure or update.
For simplicity this guide will follow the logical order of the process.
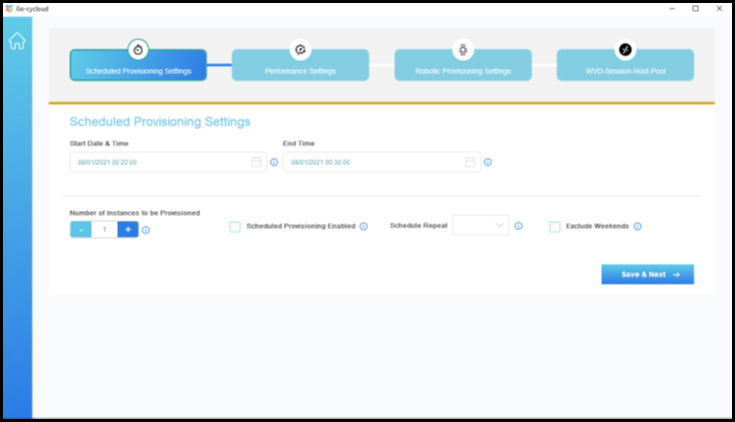
Scheduled Provisioning Settings
There are five different settings that allow Scheduled Provisioning to be configured. Each of these settings are available from the “Scheduled Provisioning Settings” page which is the default page that is viewed when a configuration tile is opened.
Start Date and Time and End Time
Possibly the most important configuration configuration item is the setting of the provisioning start and end times. It is important to understand that a provisioning schedule is defined by a time period that starts and ends within any one 24 hour period.
An example of a provisioning schedule would be that an administrator wants to provision 25 Windows 10 machines at 07:30 ready for use by user who start work around 08:00 and deprovision them at 19:00 after user have finished their working day around 18:30.
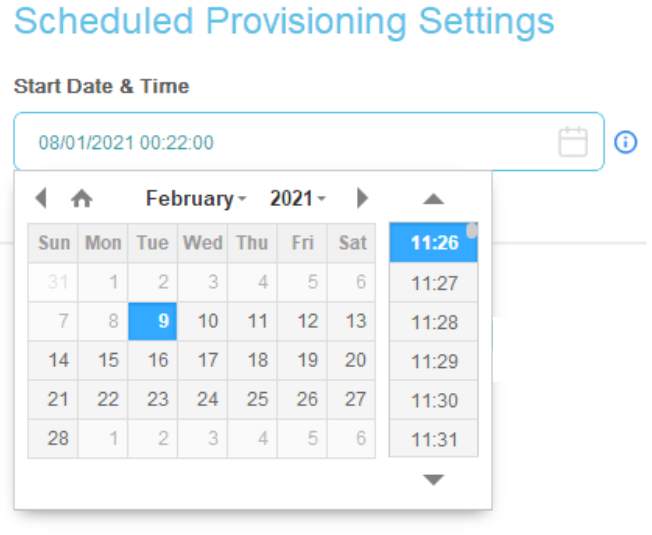
The “Start Date and Time” represents the date and time when the provisioning of machines will begin. This is configured by using a calendar widget. It is not possible to set the start date and time to a date and time that occurred in the past.
The calendar widget has a number if controls. navigation to dates and times are by way of arrows. There is also a home button that will take the user to the current date and time.
The control is self explanatory in many respects and provides the user with an easy interface to configure the “Start Date and Time” of the provisioning schedule.
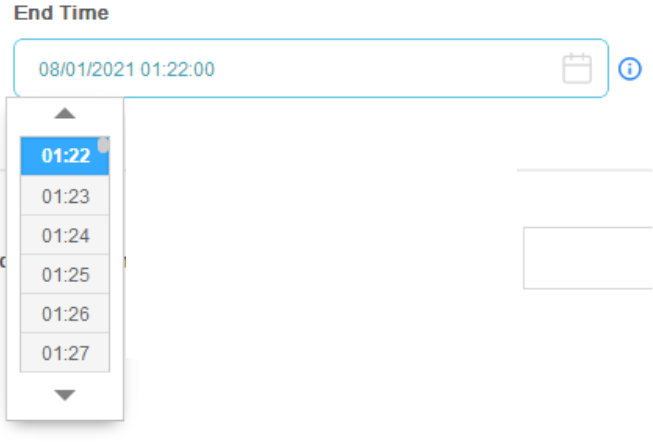
The default used for the “End Time” is equal to the “Start Date and Time” plus 1 hour. This is to ensure that any schedule set has a minimum duration of an hour. It is considered that a schedule with a total length of less than an hour is not viable and could result in machines not being fully provisioned within the hour.
The maximum “End Time” will be 23:59 which is representative of the latest time of the schedule to which a schedule could end.
Number of Instances to be Provisioned
The “Number of Instances to be Provisioned” setting is simply the number of machines that are to be provisioned when the the current data and time equals the date and time specified in the “Start Date and Time” setting.
An important consideration regarding the number of instanced required is the existing quotas set by Microsoft on your Azure subscription. The quotas for vCPU’s can limit the number of instances that can be provisioned so in order to avoid these limitations it is advised that quotas are observed and increased as necessary. The following article is useful to understand the process of requesting a quota change.
Scheduled Provisioning Enabled
On some occasions it maybe a requirement to configure a provisioning schedule but not enable it. It is best practice to keep schedules disabled until they are to become active. The “Scheduled Provisioning Enabled” setting allows this to be achieved by leaving it unchecked. The “Scheduled Provisioning Enabled” also allows disabled schedules to be enabled by simply checking the option.
Schedule Repeat
Any provisioning schedule can be repeated. The “Schedule Repeat” setting allows this to be achieved on a daily basis. As mentioned earlier a schedule cannot extend beyond a 24 hour period so an example of a repeated schedule would be as follows.
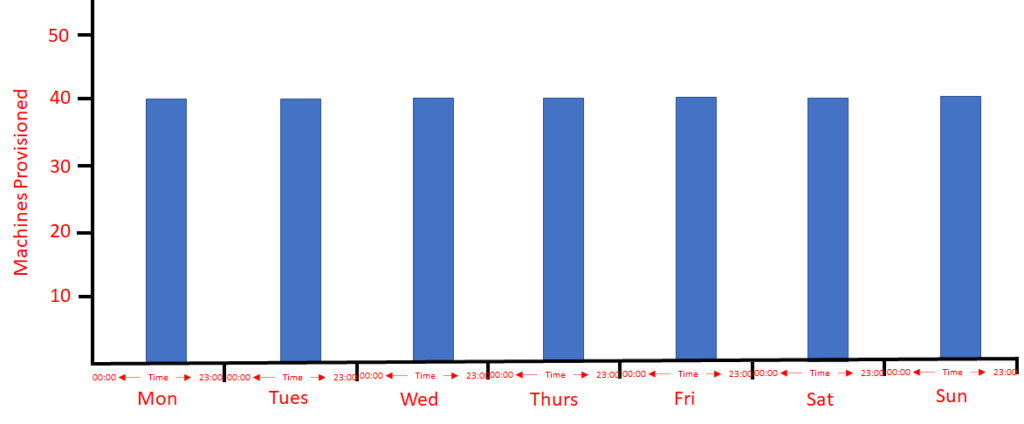
In this example 40 machines are provisioned every day at 08:00 and deprovisioned at 19:00.
Exclude Weekends
As many companies do not operating weekend work patterns it is often the case that weekends machines are not required to be provisioned. This is where the “Exclude Weekend” setting can be used. This setting simply ensures that weekends are not included in the provisioning schedule.
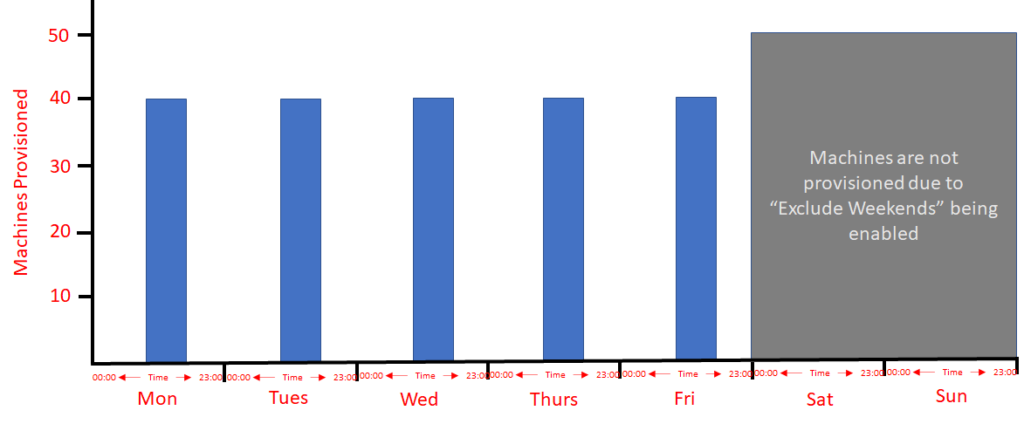
This example shows that machines are excluded from being provisioned on Saturdays and Sundays.
Performance Settings
Performance settings are performance metrics within the Windows operating system. Cycloud Agents have the capability to read each performance metric and determine the state of the machine based on the value of each metric at any given time.
For example often the performance of a machine is based on the processor load of that machine so if the processor(s) are observed at 90% for an extended period of time then it is likely that the machine is busy with processing tasks and as a consequence of that the user(s) using it will find their user experience to be compromised and may be experienced in many derogatory ways. Good user experience is important not only to the users but also to the administrators to reduce support calls.
Processor performance is not the only thing that can depreciate the user experience. Disk performance and memory availability are also key metrics that can indicate potentially degraded user experience and are perhaps better to use in certain circumstances.
Disk Performance
Disk performance is measured by the disk queue length. If users are using applications that are disk intensive this metric may be a better way of measuring the overall performance of the machine especially as this is likely to be a metric that is more likely to be breached. Many things can influence the disk performance of a machine but disk queue length is felt to be the most practical metric to use. Generally a disk queue length of more than 1 for an extended period of time is accepted as an indication of poor performance and will result in a degraded user experience.
Memory Available
Memory availability is also a key indicator of machine performance. There are many reasons why a memory shortage may occur. Poorly written applications can use excessive amounts of memory though memory leaks and some may even not return memory to the system when they are unloaded resulting in fragmented memory blocks that users can not use within their sessions. Legitimate uses of memory can still impact on user experience if the machine has been specified an incorrect amount of memory. It is not an easy task for administrators to understand how developers have written applications nor is it easy for them to determine how their user will use their applications however they will be the first to know of poor user experience. The “Memory Available” metric specifically measures the memory available to the user.
Processor Utilisation
As mentioned earlier processor utilisation is the most common performance metric used to determine user experience on a machine. This setting is the easiest to understand as it will measure the total processor time (meaning utilisation) across all processors in the machine. A rather obvious statement is that almost every task that is carried out will have some impact of processor utilisation so this metric is seldom used in isolation however in some circumstances this maybe appropriate.
Sample Rate
The sample rate setting should be considered in conjunction with the sample period setting. Each of these settings has impact on the other. When set correctly these settings enable the collection of accurate and meaningful performance data.
The sample rate setting pertains to the number of seconds between each each time that the Cycloud Agent records the various performance metrics. The Cycloud Agent will store these results in memory for the duration of the value set for the sample period.
Sample Period
The sample period setting provides a means for the Cycloud Agent to aggregating performance readings (collected by the sample rate setting) over a period of time. The units used for the sample period are minutes. This ensures that short term temporary states of performance that fall outside the performance settings do not get interpreted as real performance breaches.
For instance an administrator may know that there may be short periods of time that the processor(s) in a machine may be operating outside of his desired “Processor Utilisation” settings. These could be down to known legitimate reasons so clearly it would not be appropriate for the Cycloud Agent to interpret these spikes in processor utilisation as operating outside of the submitted performance metrics.
Performance data sampling example
The calculation used to determine the number of samples taken by the Cycloud Agent is as follows. (60/sample rate)*(sample period)
For example setting the sample rate setting to 20 and the sample period to 10 would mean that the Cycloud Agent would take a reading of all performance metrics every 20 seconds for 10 minutes. This would result in 30 samples of each of the performance metrics. Setting the sample rate to 10 and the sample period to 20 would result in 60 samples of each of the performance metrics.
An aggregated number of each performance metric is then used as the final result of the calculation.
Performance User Messaging
The “Performance User Messaging” setting allows administrators to inform users using machines that operate outside the policies sets in the performance settings.
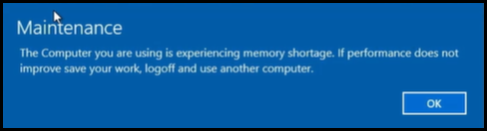
The example above is a message broadcast to users for a memory shortage event that the Cycloud Agent has detected. There are similar messages for processor and disk performance events.
Robotic Provisioning Settings
“Robotic provisioning” is the dynamic provisioning and deprovisioning of machines based on the performance of machines and the number of users logged on to them. Robotic provisioning and deprovisioning occurs within a time period set by settings set in the robotic provisioning settings. Robotic provisioning is particularly useful when the administrator cannot be sure about the number of machines that are required for any particular time and allows the system to make decisions regarding this in a completely automated way. When used correctly robotic provisioning can save huge cloud costs by deprovisioning machines when they are not being used.
Robotic provisioning tasks are carried out by Cycloud Agents which have the ability to provision machines based on the performance data collected and deprovision (only) themselves based on the number of users logged onto the machine. Cycloud Agents are able to provision only a single machine to prevent provisioning storms. Cycloud Agents will also deprovision themselves when there are no users logged on to the machine. It is important to note that Cycloud Agents will only perform robotic provisioning tasks if the current time of the Cycloud Agent is within the times set within the robotic provisioning settings.
Robotic Provisoning Start Time
The “Robotic Provisioning Start Time” is the time at which the Cycloud Agent will begin to act upon the performance data collected (See Performance Settings). When a performance event is detected the Cycloud Agent will provision a machine and (if the Performance User Messaging setting is enabled) inform users using that particular machine that a performance event has been detected.
The robotic Provisoning start time should be set no earlier than the time at which machines have completed their scheduled provisioning process and are fully operational. This time is dependant on a number of factors but is assumed that this time will be no greater than an hour after the scheduled Provisoning start date and time.
As an example it is assumed that all provisioned machines will be fully operational by 08:30 if they had been provisioned on a scheduled provisioning start time of 07:30. In reality this is likely to be much sooner however it is suggested that in this example the robotic provisioning start time should be set no earlier than 08:30. Doing this ensures that machines provisioned at start of a scheduled provisioning time will have completed the provisioning process earlier than the start of the robotic provisioning start time.
Robotic Provisoning End Time
The “Robotic Provisoning End Time” is the time at which the Cycloud Agent will stop acting upon the performance data collected (See Performance Settings).
As an example if an administrator did not want Cycloud Agents to provision machines beyond a 11:00 then this would represent the robotic provisioning end time.
Robotic Deprovisioning Start Time
The “Robotic Deprovisioning Start Time” is the time at which Cycloud Agents will act upon the number of currently logged on users to that particular machine. Cycloud Agents have the ability to deprovision themselves if there are no users logged onto the machine and the current time is after the robotic deprovisioning start time.
As an example if the robotic deprovisioning start time has been set to 15:00 and the current time is 15:10 and a Cycloud Agent detects that there are no logged on users then the machine will start its deprovisioning process.
Robotic Deprovisioning End Time
The “Robotic Deprovisioning End Time” is the time at which Cycloud Agents will stop acting on the number of currently logged on users to that particular machine.
As an example if the robotic deprovisioning end time has been set to 19:00 and the current time is 19:00 a Cycloud Agent will no longer consider the number of logged on users for deprovisioning purposes.
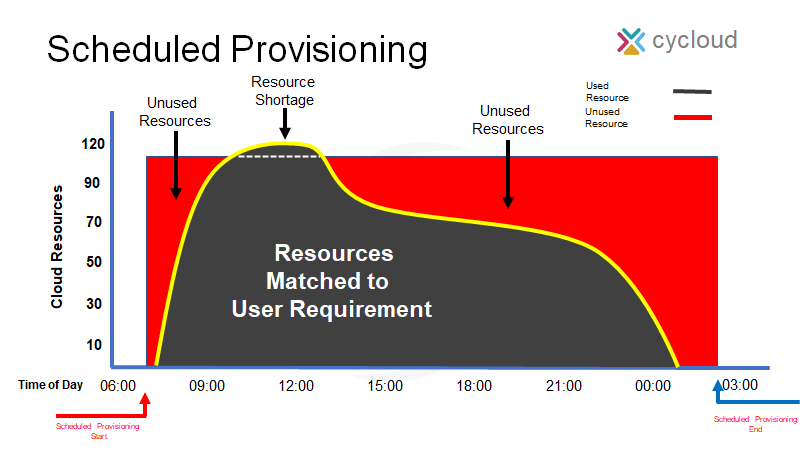
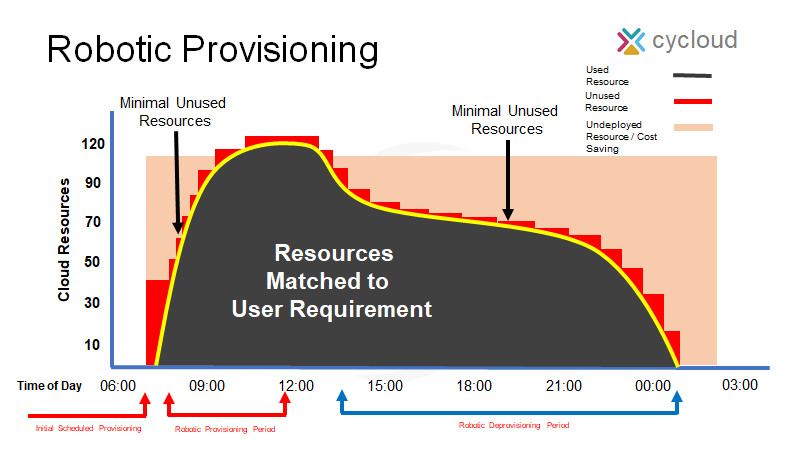
Robotic Provisioning and Deprovisioning can save Signiant costs on underutilised machines and is completely automatic requiring no Administrative intervention other than setting the appropriate settings win the Cycloud Control Centre. The following two diagrams provide a visual indication of how Robotic provisioning differs from scheduled provisioning and outlines the potential savings that can be associated with a dynamic approach to resource allocation.
The last stage of the Cycloud Control Centre
This section of the Cycloud Control Centre is represented by the name of the configuration and pertains the to the AVD host pool it is associated with. This provides a reminder of what configuration is being worked on directly within the interface. It also provides a number of configuration items that refine the deprovisioning of machines as well as useful information for the administrator.
The first three items are displayed at the upper section of the Cycloud Control Centre and are simply information for the administrator. They provide the configuration type (In this case it is Microsoft AVD) the names of the Azure Resource Group and AVD host Pool to which the configuration applies. This can be seen in the following screenshot.

Enable Deprovisioning Messaging
This setting provides a means of the administrator informing users that the machine they are using is about to be deprovisioned. This setting exposes two text boxes that the administrator can type a personalised user message into. This can be seen in the following screenshot. Messages are broadcast to users using each machine within the configuration.

Deprovisioning Message Timer
This setting simply sets a time period (in minutes) between when the first and second user messengers are broadcast. For instance if the end of the scheduled provisioning period was 19:30 this would be the time the first deprovisioning message would be broadcast to users on the machine. If the deprovisioning message timer was set to 15 then the second deprovisioning message would be broadcast to users at 19:15.
User Retention
This setting allows users to remain using their machines even after the scheduled provisioning end time has passed. For instance if the scheduled provisioning end time was set to 19:00 and this setting was selected users would not be forcibly logged off the machine and could continue using the machine until they chose to logoff themselves. This is particularly useful when hard scheduled provisioning end times are not possible due to unpredictable user working patterns.
It maybe appropriate in the interest of maximising cost savings that users were not allowed to to simply remain logged onto machines when they are not actively working. This would simply prolong the schedule unnecessarily. This can be achieved by creating a Microsoft group policy containing two settings.
The first setting is “Set time limit for active but idle Remote Desktop Services sessions” and the second is “End session when time limits are reached”. These settings can be found by running the Group Policy Editor and navigating to the following location.
Computer Configuration > Administrative Templates > Windows Components > Remote Desktop services > Remote Session Host > Session Time Limits
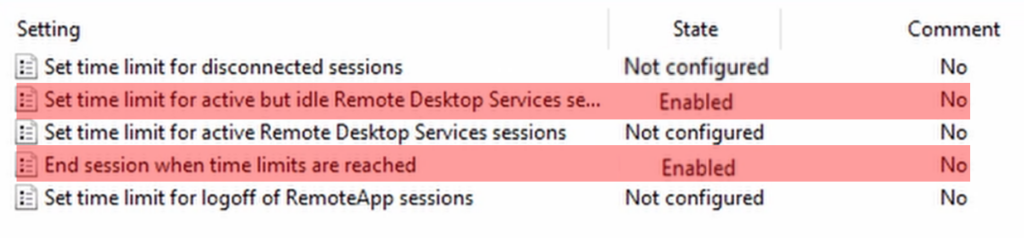
The “Set time limit for active but idle Remote Desktop Services sessions” should be enabled and the the required idle timeout time set. It is suggested that no more than 30 mins be set to reduce any extended schedule period.
The “End session when time limits are reached” setting will simply log the users off the machine when the configured time set in the “Set time limit for active but idle Remote Desktop Services sessions” setting has passed.
It is advised that the GPO containing these settings be linked at the Active Directory OU where Cycloud provisions the machines into.
Drain Mode
The drain mode setting provides a means of ensuring that users do not connect to machines when they are about to be deprovisioned. This is a setting that is applied at Azure level but pertains to machines individually and becomes active at schedule end time.