- Overview
- Installation Process and Flow
- Supported Operating Systems
- Hardware Requirements
- Cycloud Prerequisites
- Cycloud Unified Installer
- Cycloud Product (Setup)
- Cycloud Control Centre
- Information Required Prior to Running the Installer
- Cycloud Control Centre Installation
- License Installation
- Cycloud Controller
- Information Required Prior to Running the Installer
- Cycloud Controller Installation
- Cycloud Controller Fault Tolerance
- Cycloud Agent
Overview
Cycloud is a technology solution that has been designed with easy installation and configuration in mind. Every effort has been made to ensure the highest degree of automation is provided to ensure a consistent and easy installation process.
This document provides detail of the steps involved in installing Cycloud and configuring it to operational level.
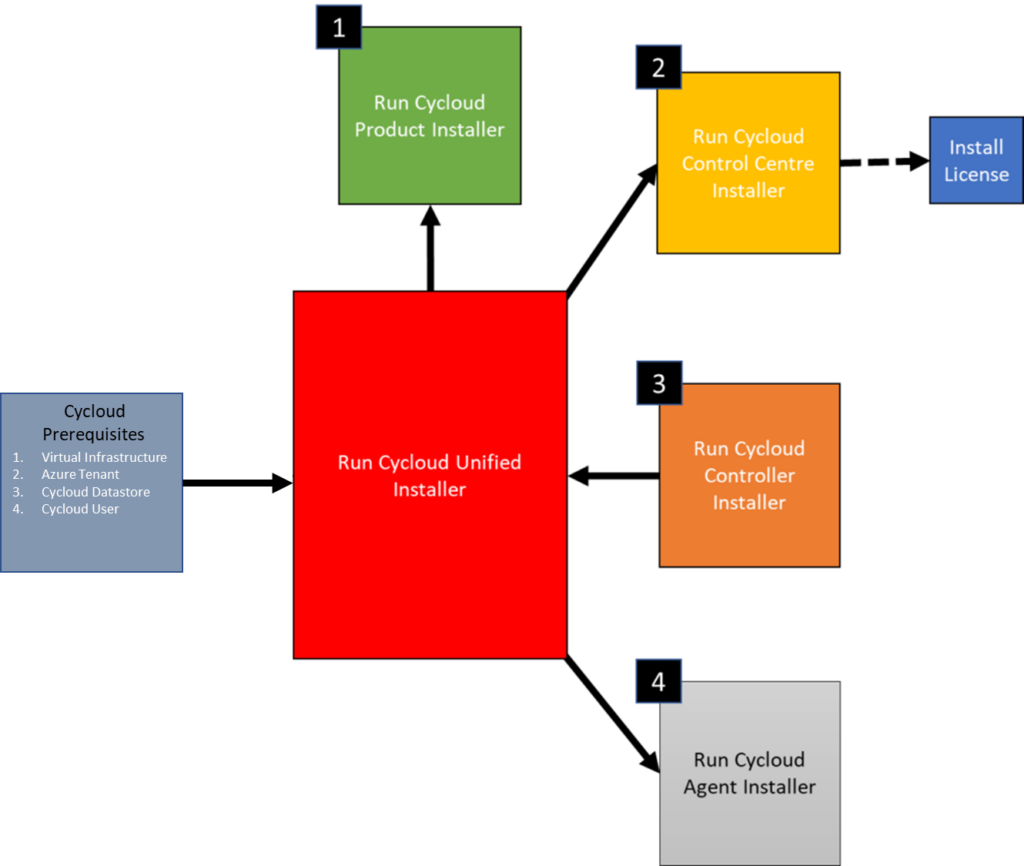
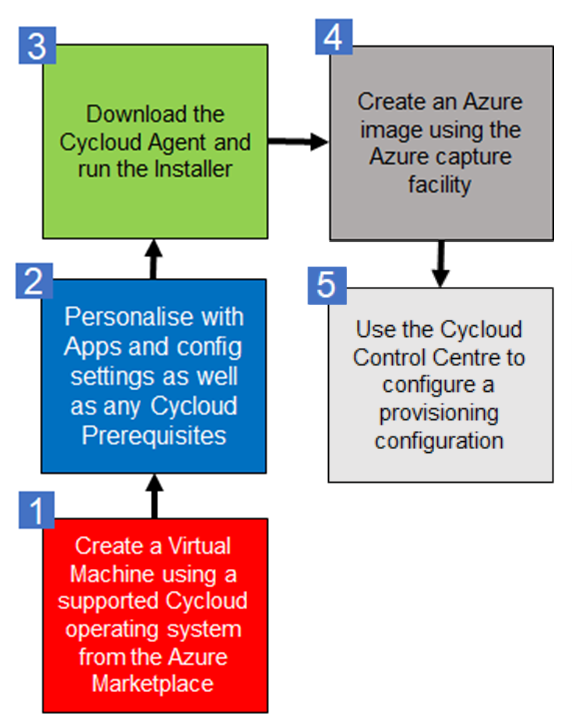
Installation Process and Flow
The following diagram shows the full Cycloud installation process. The Cycloud Unified Installer is integral to installing Cycloud components and is recommended however each component can be installed separately with its own installer.
There are some prerequisites that are needed that require some manual steps which will be discussed.
Supported Operating Systems
Cycloud components can be run on any machine running a supported operating system. Supported operating systems are as follows.
- Windows Server 2016 (All Editions)
- Windows Server 2019 (All Editions)
- Windows Server 2022 (All Editions)
- Windows 10 (All Versions)
- Windows 11 (All Versions)
Hardware Requirements
The hardware requirements for Cycloud components are small and are driven largely by the availability of exiting machines and if they are to be used.
The only Cycloud component that is required to be a Cloud VM is the Cycloud Agent but for consistency the hardware in the below table has been set on minimum Azure machine sizes.
| Product Installer | Control Centre | Cycloud Controller | Cycloud Agent |
| Standard_B2s | Standard_B2s | Standard_B2s | Standard_B2s |
In addition to the above table it is important to note that storage requirements are very small so around 500MB on disk. It is also not a requirement for high speed SSD storage. 100Mb of free memory is also required
It is also expected that some Cycloud components will be installed on existing machines so working on that basis the above information is given as a guide.
Cycloud Prerequisites
Cycloud requires a number of prerequisites. They can be categorised into infrastructure and software.
Software prerequisites can be installed automatically using the Cycloud Unified Installer as part of the specific Cycloud module being installed which makes the process a lot easier however they can also be installed manually if required.
Infrastructure prerequisites are to some extent obvious including cloud and virtual infrastructure. This document explains in detail all Cycloud prerequisites.
Cycloud Unified Installer
The Cycloud unified installer is a simple, intuitive user interface that provides a consistent, unified user experience specifically for the installation and configuration of Cycloud software components. It is available as an integral part of the full Cycloud product download available from the Cycloud download section of the GoCycloud website.
User Interface
The Cycloud unified installer user interface has been designed to make the installation of Cycloud components as easy as possible.
The installation of required software components is also automated by running each Cycloud component from the Cycloud unified installer user interface.
After downloading the Cycloud software and unzipping it, the first thing to do is to locate the Cycloud unified installer executable file. This can be found in the root directory of the unzipped software.
Double clicking on the “Cycloud-Unified-Install.exe” file will start the installer. The first thing that is performed is an analysis of the system that it is running on. This is required in order to assess various parameters in regard the how suitable the machine is to host each component along with any potential issues that may affect the installation.
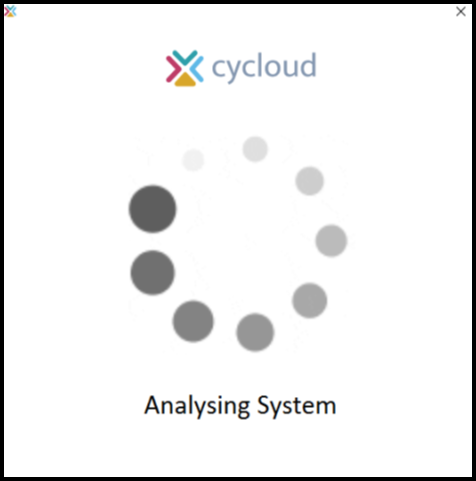
After a few moments the Cycloud unified installer user interface will be displayed. If the user interface is displayed this means that the analysis of the system did not encountered any issues. Should this have not been the case then appropriate warning message(s) would have been displayed an the loading of the user interface aborted.
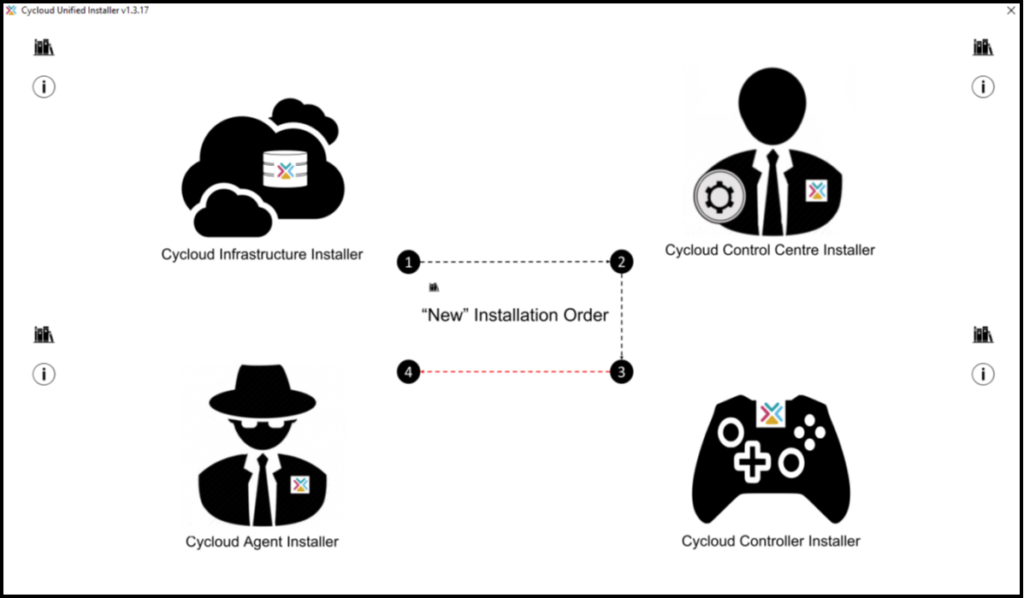
The screen above assumes that there have been no issues found. The user interface is clean and self explanatory however below is a brief explanation of each area of the user interface and what it does.
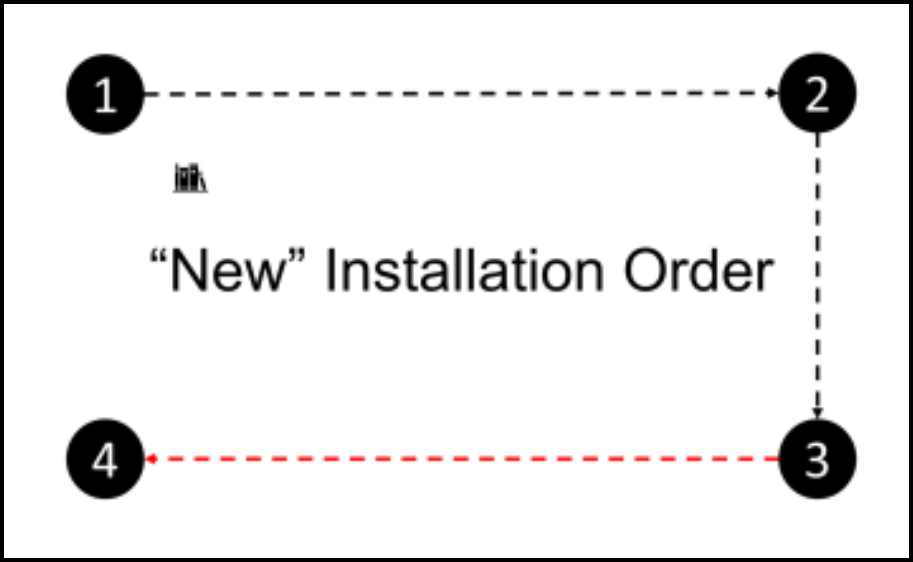
The centre section is simply to indicate the order of installation and is for information only. It assumes a new installation.
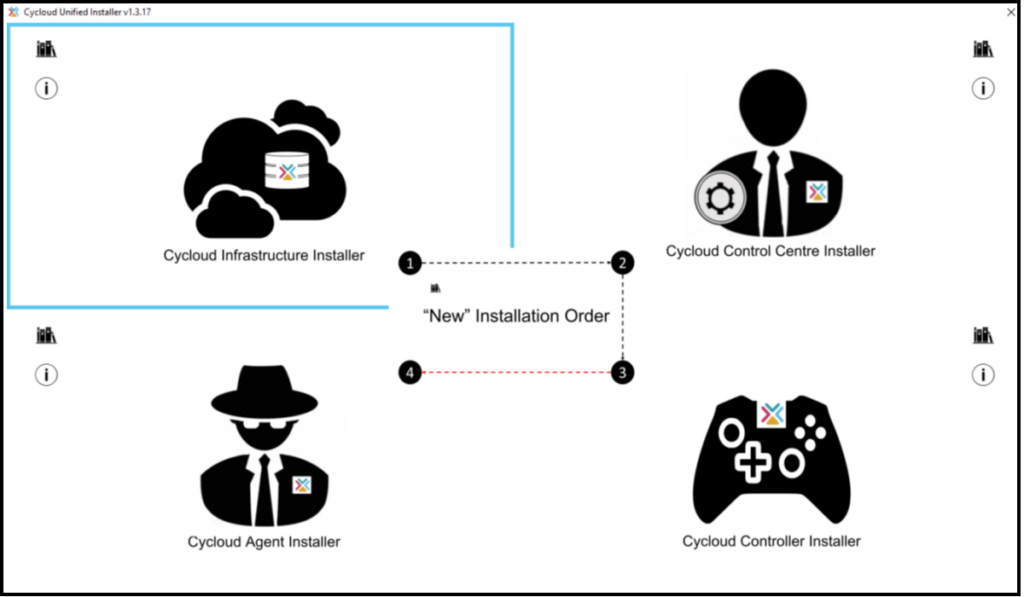
Each Cycloud component can be selected by hovering the mouse over its icon. When this is done the icon will be highlighted with a coloured border.
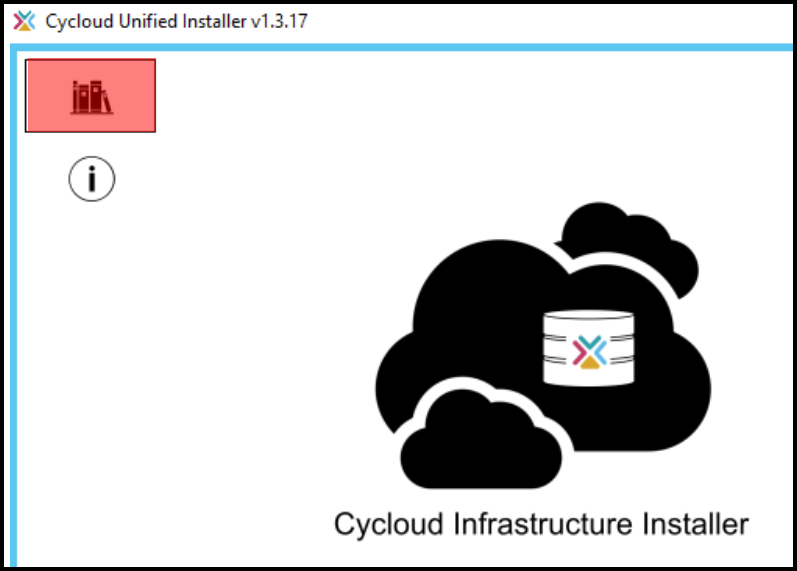
A documentation icon is available on each Cycloud component section that opens the documentation page for each component from the Cycloud website.
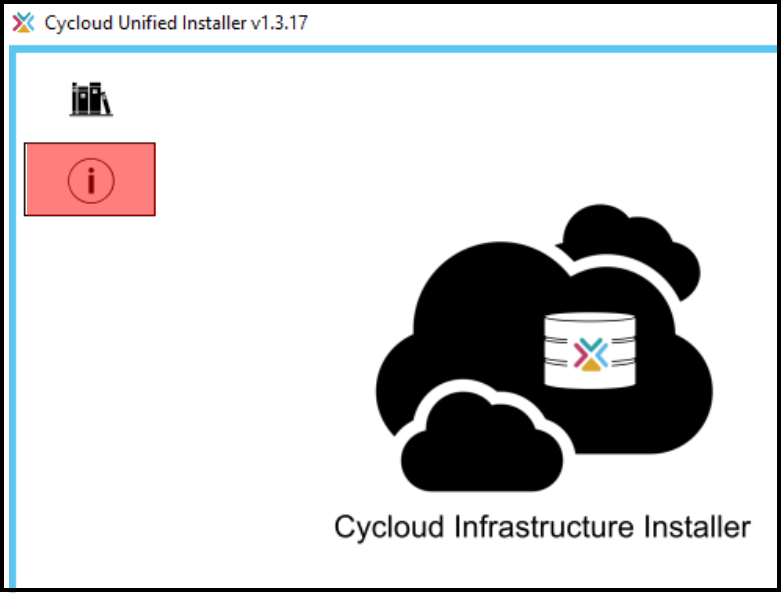
There is also an information icon on each Cycloud component section. This provides details of information required by from user to install the relevant Cycloud component.
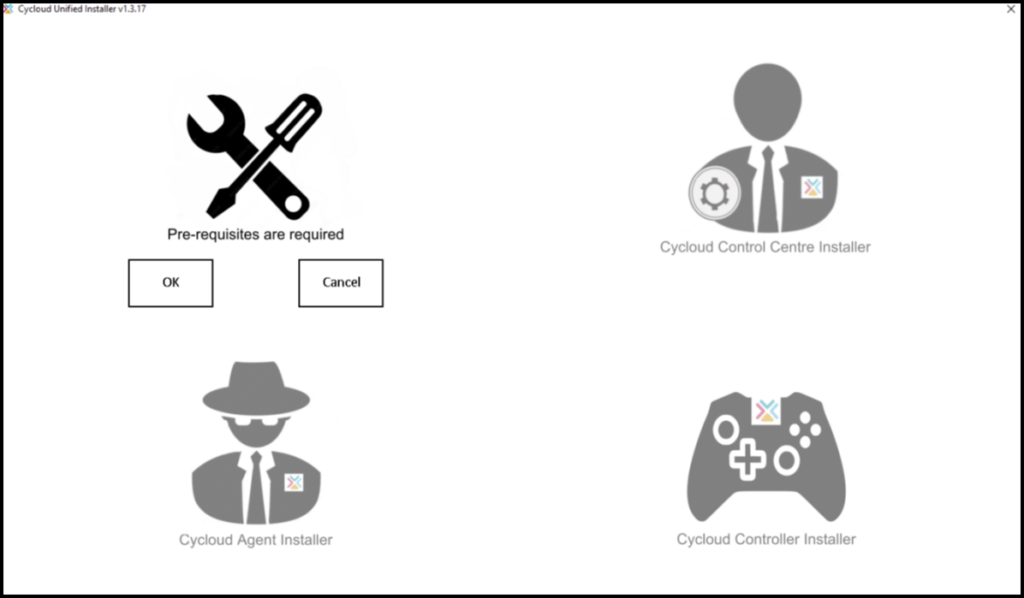
Clinking on a section of the user interface that has an active coloured border will run the relevant Cycloud component installer process however should a required software prerequisite not be present then the Cycloud unified installer will indicate this to the user by prompting the user to install it. At the same time all other component sections are greyed out.
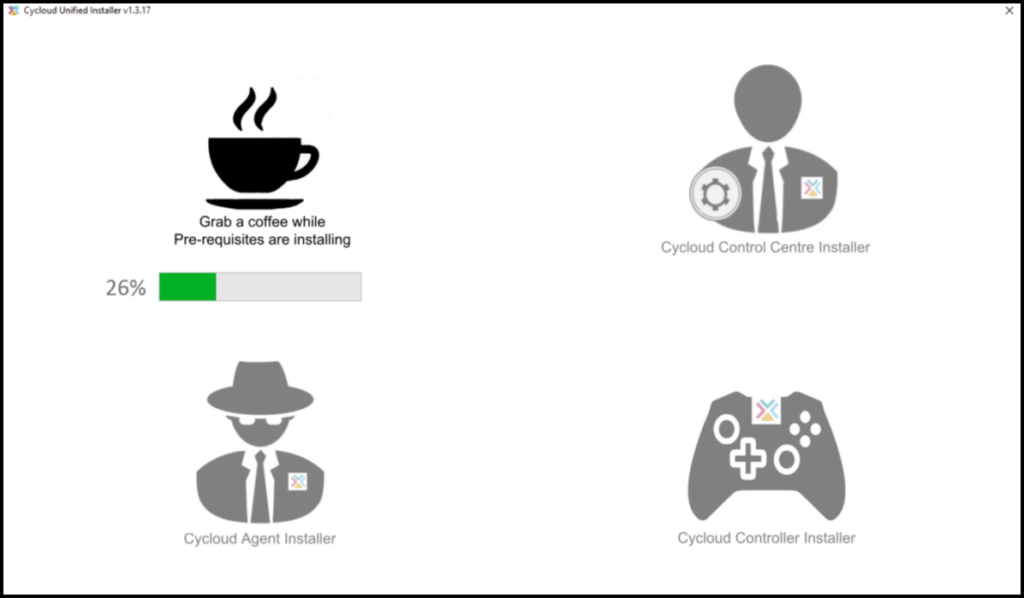
Selecting the “OK” button will install the prerequisites for that particular Cycloud component. A visual indication of installation progress is then displayed as below.
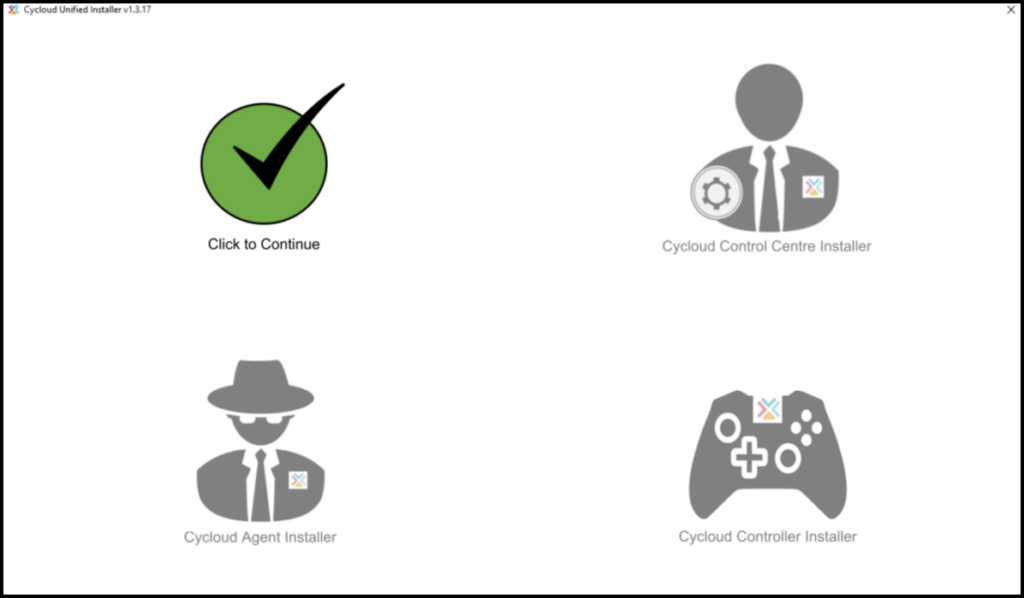
After the installation of the prerequisites has completed the selected component section will display either a green tick icon if the installation of the prerequisites was successful or a red cross if it failed.
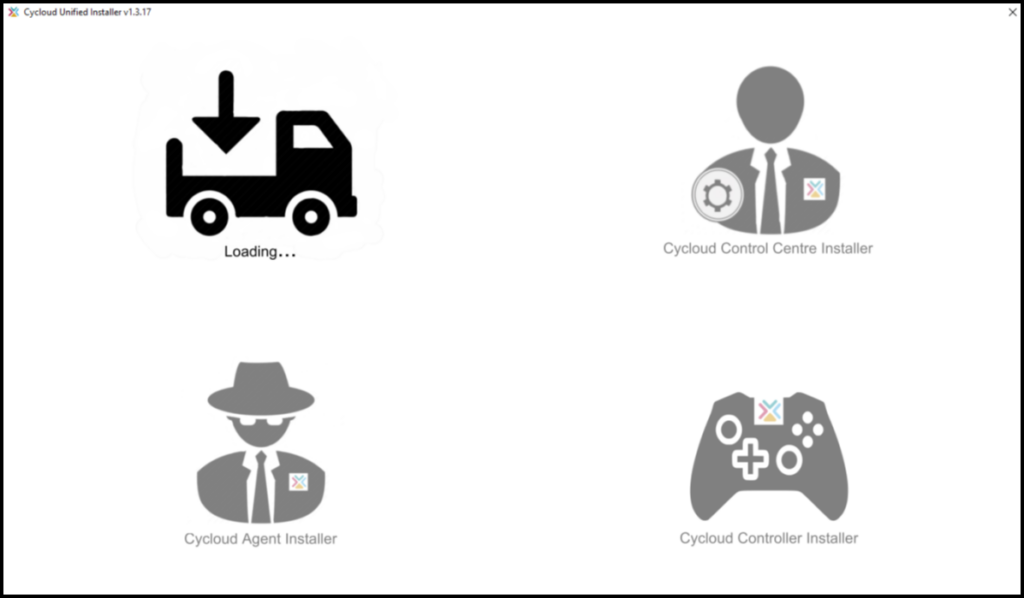
Clicking on the Cycloud component again will result in the component installer loading. Again a visual indication of this is given to the user while the individual component installer is loading whilst the remaining component areas are greyed out.
Each Cycloud component installer has its own installer interface requiring different information to populate the various fields.
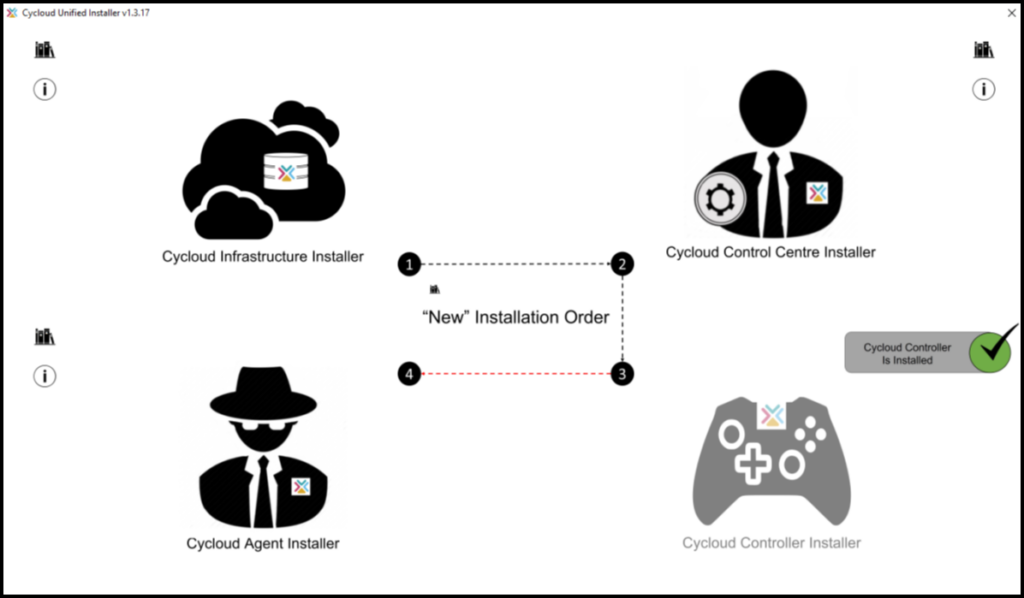
After each Cycloud component has completed its installation the remaining component areas will be un-greyed and made available to the user except for the component that has been installed which a greyed out icon will be presented indicating that the component has been installed. This insures that the component cannot be installed multiple times.
Event Logs
Various actions are logged to the Cycloud unified installer event log. This is created when the Cycloud unified installer is run for the first time.
It can be found by running the Windows event viewer application and searching under “Applications and Service Logs”
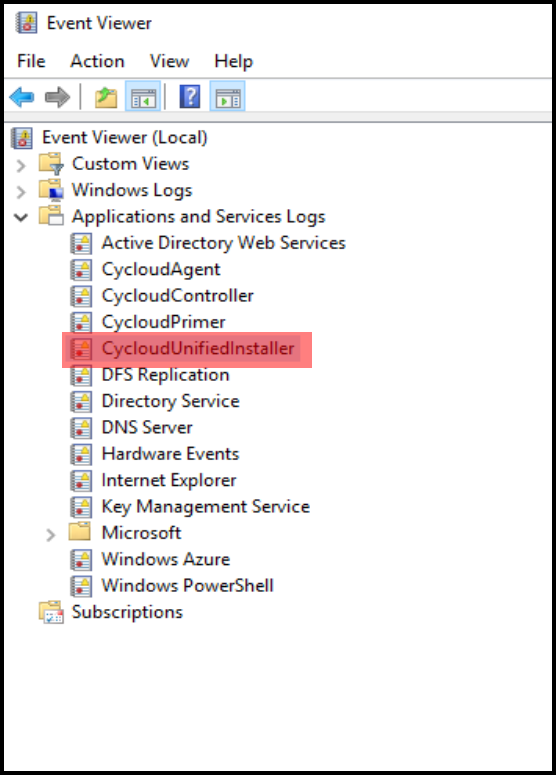
Information that is logged to the event log include the success or failure of various prerequisites along with other relevant information.
Cycloud Product (Setup)
The Cycloud product installer automates several steps required for Cycloud provisioning to work within an Azure tenant. From the user / installers perspective the process is extremely simple, and wizard driven requiring the installer to answer several simple questions to complete the installation. It is strongly advised that the required information is at hand prior to beginning the installation to prevent any confusion that can terminate the installation. Again, this document will highlight the required information and where it can be obtained. An important point is that to install the Cycloud Product an Azure tenant must exist, or a new tenant created. This link explains how to create a tenant if required.
Information Required Prior to Running the Installer
Azure global administrative user account credentials including username, password, Azure subscription ID and Azure tenant ID. Your subscription ID and tenant ID can be found from within the Azure Admin Console. This article may be of assistance.
Information regarding the Microsoft file share that is to be used for the Cycloud Data Store is also required. This is simply the UNC path to the share location. This could be an existing file share (with the appropriate permissions etc) or a file share created using the process explained later in this guide. In either case the Microsoft Share information is simply the file share name in UNC format. Example: <\\ServerName\ShareName>
Cycloud Product Installation
Installation step process
- The Cycloud product software is part of the Cycloud software that can be downloaded from the Cycloud download page. Unzip it and save it to a location on the machine that has been selected to run the Cycloud Product Installer.
- The Cycloud Product Installer can be run from the Cycloud unified installer (Recommended) or separately by following the rest of this guide but the process is exactly the same from accepting the Cycloud EULA.
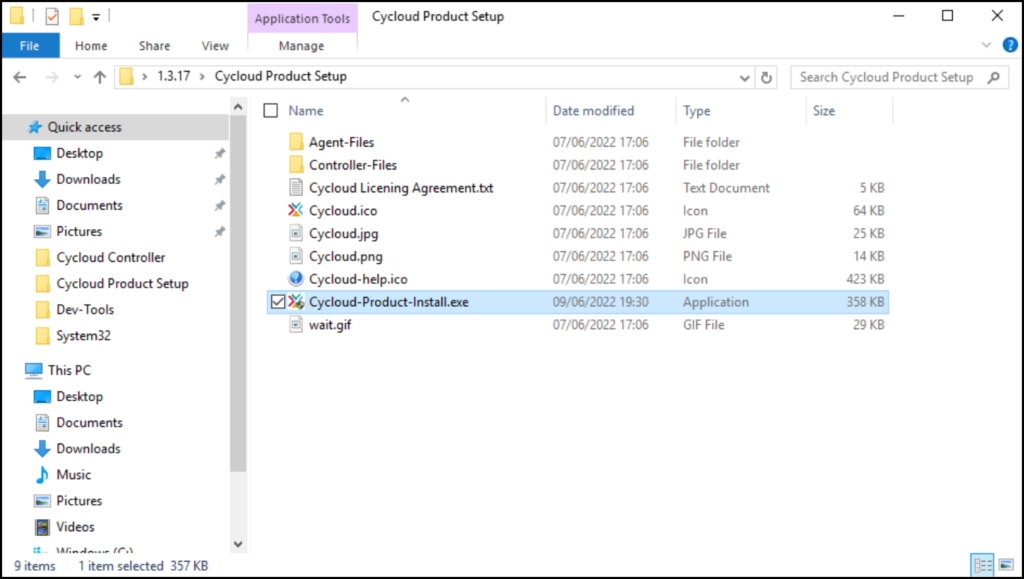
- Go to the Cycloud Product Setup directory and locate the “Cycloud-Product-Install.exe” file. Double clicking on this file will automatically run the Cycloud Product Installer as Administrator.
- Read and accept the Cycloud EULA
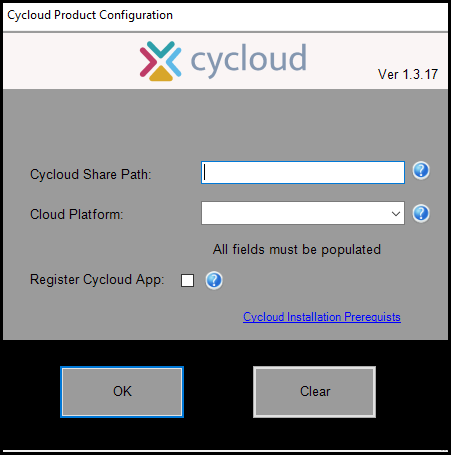
- Enter the path to the Cycloud Data Store in UNC format. (Help bubbles are provided if required)
- Select the cloud platform from the dropdown box. (Microsoft Azure is supported at this time).
- If this is the first time the Cycloud Product Installer has been run it is essential that the “Register Cycloud App” checkbox is selected. This is required to register Cycloud with Azure. If the checkbox is not selected then the installer will setup the Cycloud Datastore only and is useful when Cycloud has already been registered with Azure.
- Accept the message that informs the user that a new directory structure will be created. If the installer finds an existing directory structure a backup will be made of it before a new directory structure is created.
- Enter your Azure subscription ID and Azure tenant ID.
- You will be asked to authenticate to Azure using the Microsoft form. Please enter your Azure login credentials along with any two factor details (if enabled). The Azure user needs to have global administrative which ensured the permissions to create the following Azure objects.
- Azure App Registration
- Azure Role Assignments
- Azure Custom Roles
- Azure Service Principal Accounts
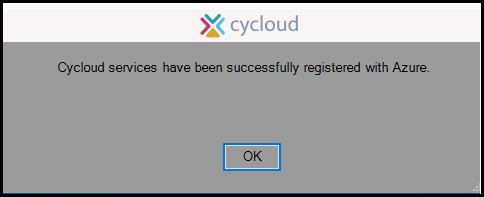
- After a few moments the Cycloud Product Installer will inform the user that Cycloud Services were successfully registered with Azure. It is at this point the Cycloud Product Installer has completed the Cycloud App registration process.
The following screenshots are of the above process.
Browse to the Cycloud-Share-Installer.exe file and run it
Provide the Cycloud Datastore path in UNC format and select the cloud platform from the dropdown box.
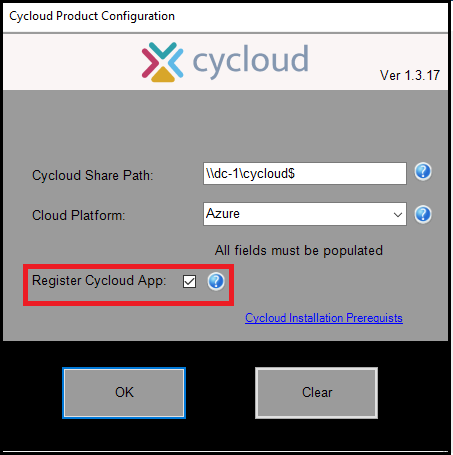
If the Cycloud Product Installer is being run for the first time it is necessary to ensure that the “Register Cycloud App” checkbox is selected.
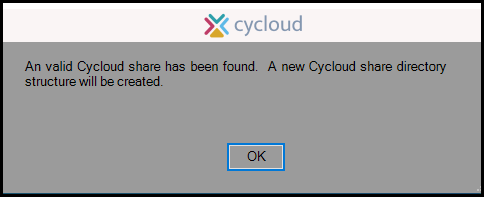
If the UNC path entered previously is correct and a valid share path is found the above message will be displayed.
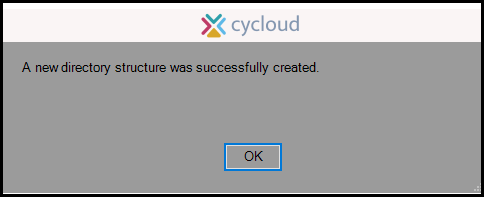
A new Cycloud directory structure will then be created.
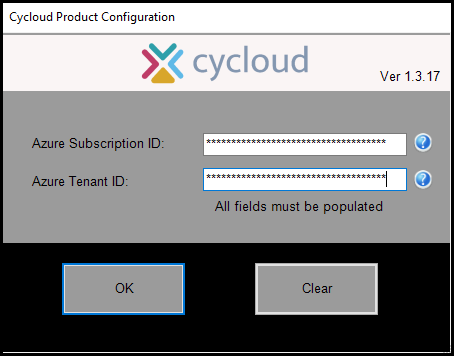
The user will then need to provide their Azure Subscription ID and their Azure Tenant ID.

The user will then need to provide their Azure login credentials (as well as two factor details if enabled) to authenticated to Azure.
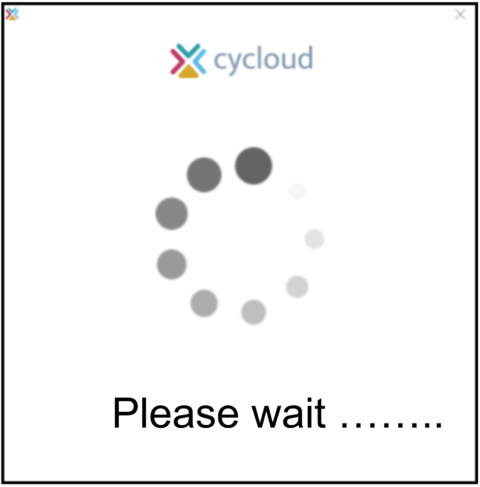
As the process may take a few moment a wait screen will be displayed until the various Cycloud component are fully installed.
The last message shown by the Cycloud Product Installer is when it has completed the creation of all Azure objects. At this point the Cycloud Project Installer has completed all its task and the Cycloud software is registered with Azure and considered complete.
The following screenshots show the various objects after the Product Installer has successfully created them. The user installing the Cycloud Product may wish to look at the various object after installation to confirm their presence although this is not a required step in the installation process.
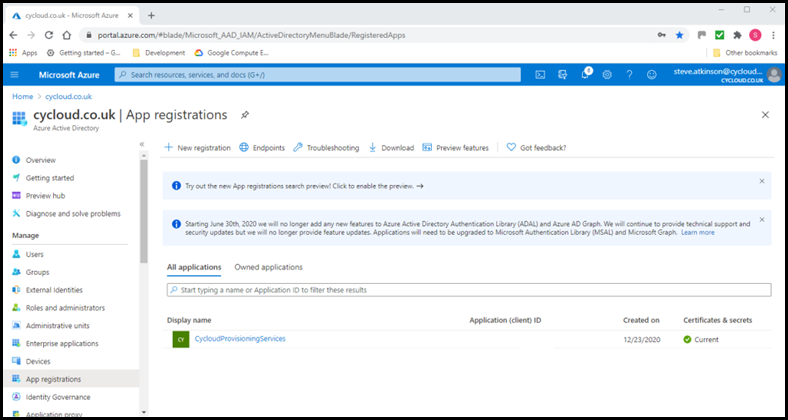
The Cycloud Product Installer creates an App Registration that can be found within Azure Active Directory. Simply open “Azure Active Directory” within the Azure management portal and navigate to “App Registrations” which can be found in the left pane of the interface. Once at this point select “All Application” option and browse to the application called “CycloudProvisioningServices”. This is the app that the Cycloud installer registered.
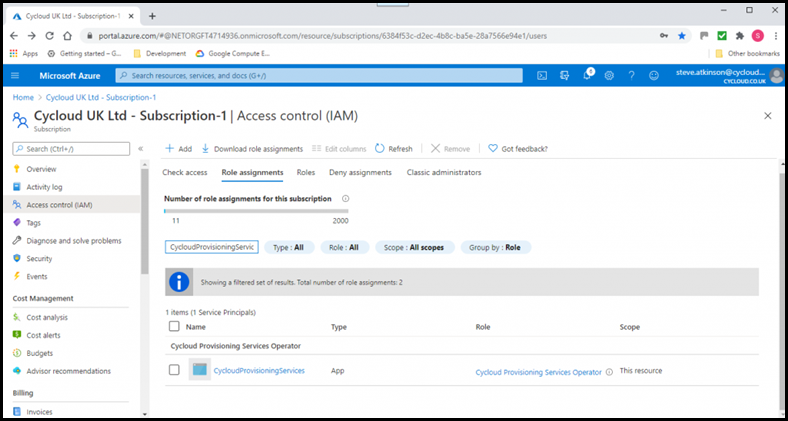
The Cycloud Product Installer also creates a custom “Role Assignment” called “CycloudProvisioningServices” that can be found by opening “Subscriptions” from the Azure management portal and selecting the appropriate Azure subscription. After that select “Access Control (IAM)” from the centre pane and then “Role Assignments”. If the “CycloudProvisioningServices” role assignment does not appear it may be necessary to search for it using the “Search by name or email” field.
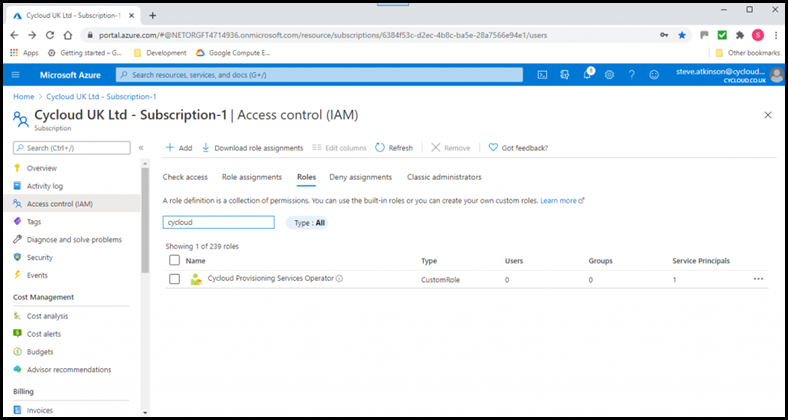
The last item the Cycloud Product Installer creates is a custom “Role” called “CycloudProvisioningServices”. This object can be found by opening “Subscriptions” from the Azure management portal and selecting the appropriate Azure subscription. After that select “Access Control (IAM)” from the centre pane and then “Roles”. If the “CycloudProvisioningServices” role does not appear it may be necessary to search for it using the “Search by name or email” field.
Potential Issues and Clarification Information
If any issues are encountered during the installation of the Cycloud Product Installation a log file (Install.log) of the installation can be found in the directory where the “Cycloud-Share-Installer.exe” file was run.
It is suggested that if clarification of each stage of the Cycloud Product Installation is required the following points maybe helpful.
After installation of the Cycloud Product has completed the Cycloud Azure objects would have been created. These can be found using the Azure Management Portal as described in the preceding sections.
As part of the installation the file structure of the Cycloud Data Store would have been created. This should look like the following screenshot.
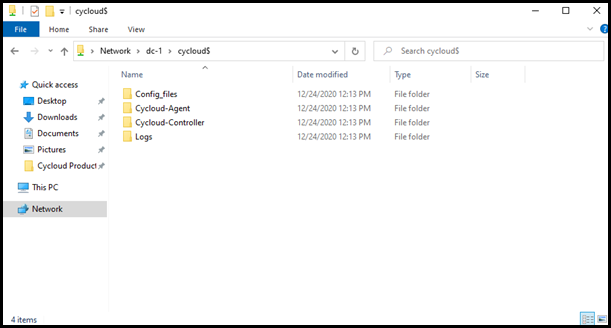
There should be four directories off the root of the share. There will be various subdirectors within these directories each having significance to the operational running of the Cycloud solution however if the four top level directories are seen then it is assured that the file structure was created successfully and the Cycloud Data Store is operational.
As long as this document is followed correctly then there are seldom any issues experienced with the Cycloud Product Installation process. The actual installation process takes just a few minutes to complete but attention to detail at this point will yield better results than if not.
Cycloud Control Centre
The Cycloud Control Centre is the administrative interface for configuring Cycloud technologies. It has been designed to be simple and uncluttered to enhance the administration experience without compromising on effectiveness. The Cycloud Control Centre is simple to install and use and has been designed to run on supported operating systems requiring minimal hardware resources. There are no software component prerequisites required prior to beginning the installation however infrastructure prerequisites should have been completed along with some the collection of some required information. A detailed explanation including the functionality available within the Cycloud Control Centre can be found in the Cycloud Administrators Guide.
Information Required Prior to Running the Installer
Information regarding the Microsoft file share that is to be used for the Cycloud Data Store is also required. This is simply the UNC path to the share location. This could be an existing file share (with the appropriate permissions etc) or a file share created using the process explained later in this guide. In either case the Microsoft Share information is simply the file share name in UNC format. Example: <\\ServerName\ShareName>
Cycloud Control Centre Installation
The Cycloud Control Centre is included with the full Cycloud Product software available from Cycloud downloads page. Installation can be installed via the Cycloud unified installer (Recommended) or directly from it’s own installer executable “Cycloud-Controller-Install.exe”. These processes are simple and similar to each other.
It is important to note that the Cycloud Control Centre is not an application that has been designed to be shared between users so when it is installed it will be installed for the current user only. The installation path will be “C:\Users\%username%\AppData\Local\Programs\Cycloud Control Center” and cannot be changed. This is to ensure that the application can write temporary files within this directory.
The following process shows the installation process from the “Cycloud-Control-Centre-Install.exe” file however this process when compared to running the installation from the Cycloud unified installer is identical from when the EULA screen is shown.
First of all browse to where the Cycloud software was unzipped and locate the “Cycloud Control Centre” directory. Double click on the The self extracting installer (Cycloud-Control-Centre-Install.exe).
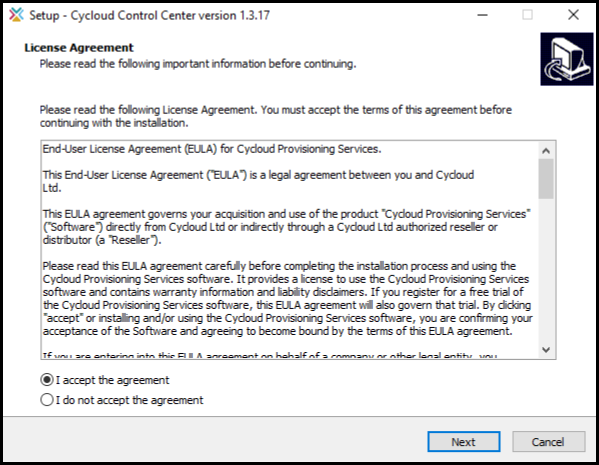
The first thing that is required is to agree to the Cycloud EULA.
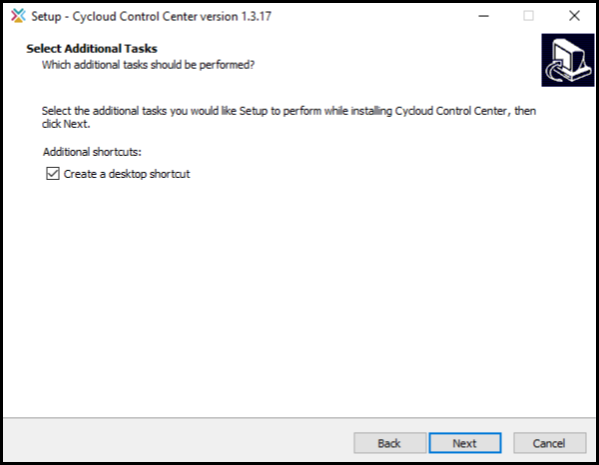
The next screen presents the option to create a desktop shortcut on the users desktop.
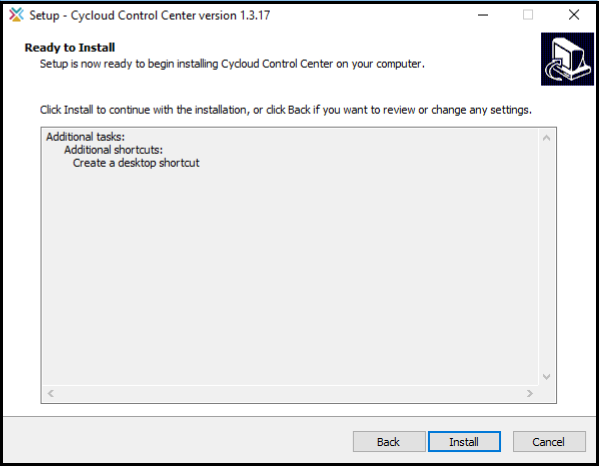
The next screen prompts for the Cycloud Control Centre to be installed.
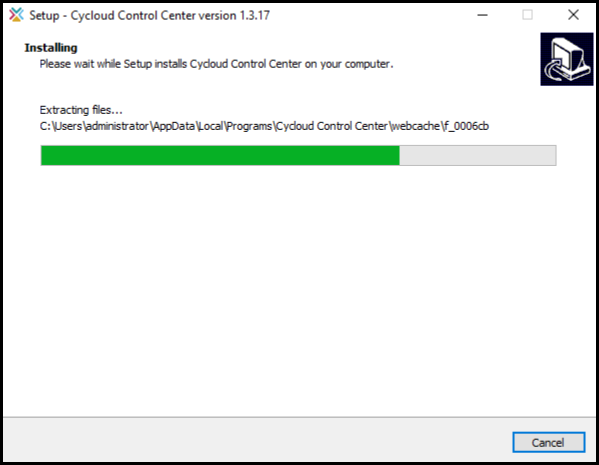
The Cycloud Control Centre installer will take a few moments to complete the installation.
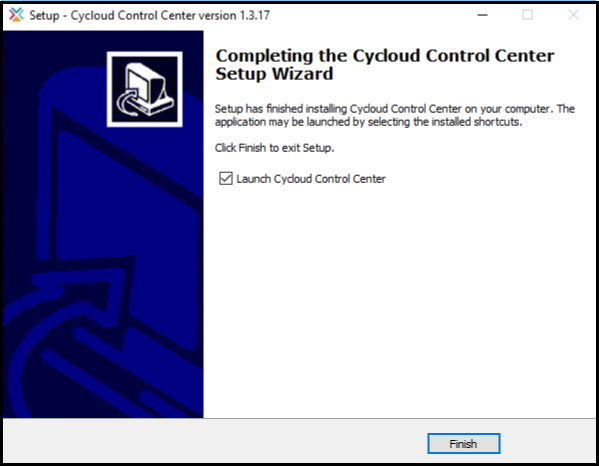
At the end of the installation the user will be prompted to launch the Cycloud Control Centre by checking the “Launch Cycloud Control Centre” check box or simply finishing the installation by clicking the “Finish” button.
Uninstalling the Cycloud Control Centre
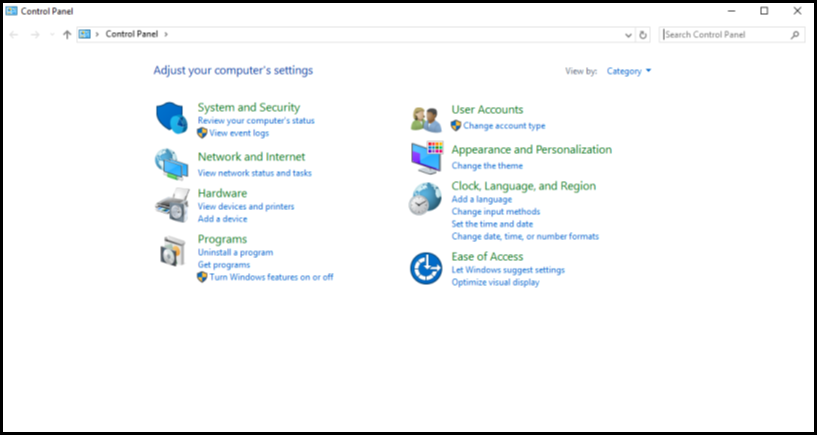
Uninstalling the Cycloud Control Centre is performed by using the Control Panel “Programs” applet and selecting “Uninstall a program”.
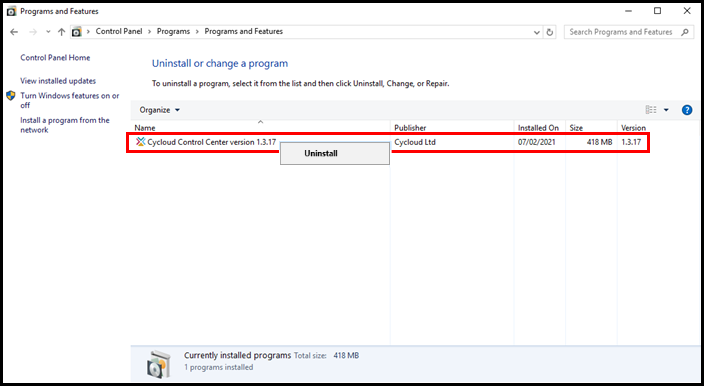
Right clicking the Cycloud Control Centre application provide an option to uninstall the software.
License Installation
The Cycloud Control Centre is used to install the Cycloud license. Details of how to do this can be found here.
Cycloud Controller
The Cycloud Controller is an optimised Windows scheduled task that provides scheduling logic for Cycloud provisioning and deprovisioning tasks. Its installer automates various steps required to install the Cycloud “Controller Service” efficiently and easily.
It is strongly advised that the required information is at hand prior to beginning the installation to prevent any confusion that may cause issues with the installation. Again, this document will highlight the required information and where it can be obtained.
Information Required Prior to Running the Installer
Information regarding the Microsoft file share that is to be used for the Cycloud Data Store is also required. This is simply the UNC path to the share location. This could be an existing file share (with the appropriate permissions etc) or a file share created using the process explained later in this guide. In either case the Microsoft Share information is simply the file share name in UNC format. Example: <\\ServerName\ShareName>
The Cycloud user name and password as well as where this user object exists in Active Directory. Details can be found here.
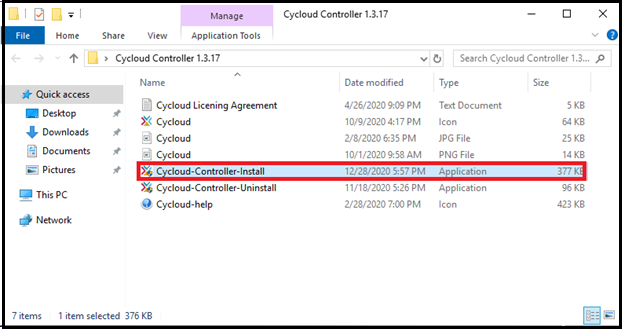
Cycloud Controller Installation
The Cycloud Controller software is part of the Cycloud Product software available for download from the Cycloud download page. Installation can be installed via the Cycloud unified installer (Recommended) or directly from it’s own installer executable “Cycloud-Controller-Install.exe”. These processes are simple and similar to each other in that they are identical from the acceptance of the Cycloud EULA.
Unzip and save the software to a local location on the machine that is to be the Cycloud Controller.
Browse to the directory containing the Cycloud Controller software and find the “cycloud-controller-install.exe” file. Double clicking this file will begin the installation.
The following outlines a typical installation of the Cycloud Controller.
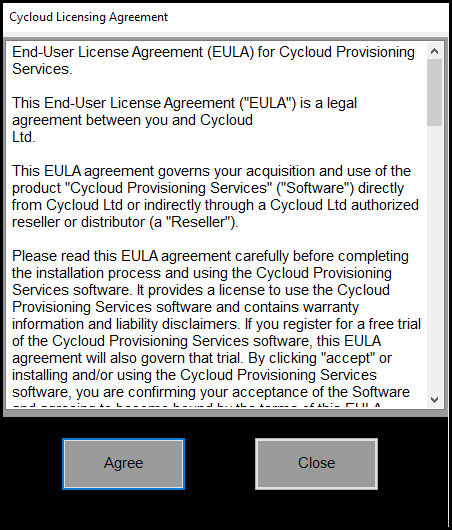
Read and accept the Cycloud EULA.
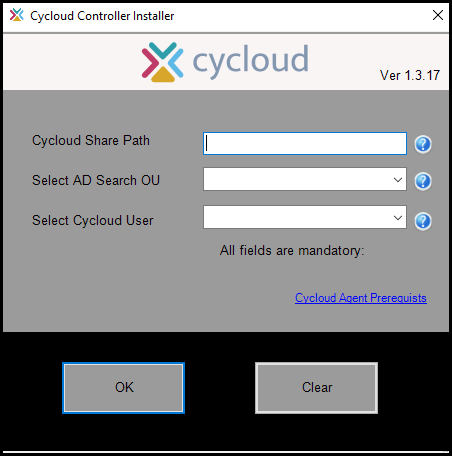
Enter the path to the Cycloud Data Store (using UNC format) and select an OU and user from the two drop down boxes. The user that you select would be the user created during the installation of the Cycloud product installation or be a user with the same privileges.
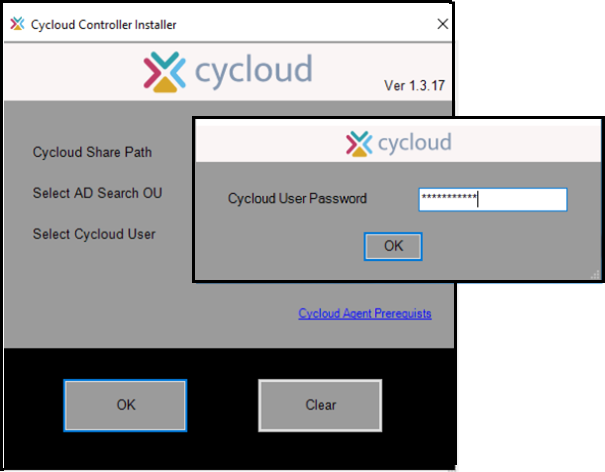
Enter the password for the selected user.
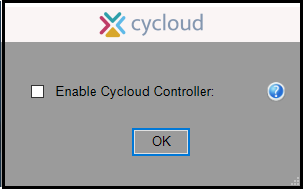
Decide to either enable the Cycloud Controller service by selecting the “Enable Cycloud Controller” checkbox or to leave it blank so that it can be enabled later by using the Cycloud Controller shortcut that is placed on the users desktop. It is a good idea to keep the Cycloud Controller Service disabled until Agent configurations have been completed. This will reduce errors being written to the Cycloud Controller logs.
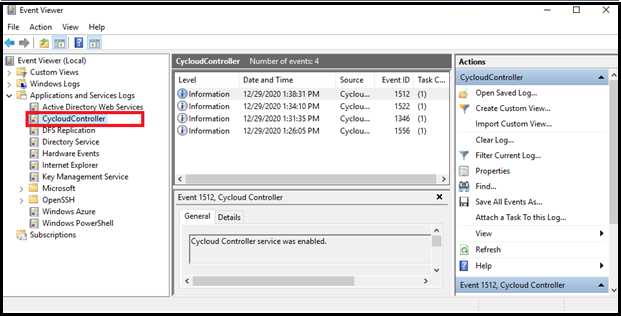
Each stage of the Cycloud Controller installation is logged and can be queried using the Windows Event viewer. The installation process is simple so it is not usual to see any errors.
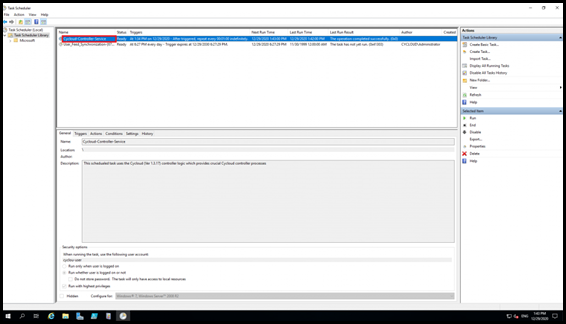
The Cycloud Controller Service can be seen by using the Microsoft Task Scheduler utility. The Cycloud Controller Service (When Enabled) runs every minute. This can be observed by the times stated within the Task Scheduler utility as well as information containing the success of each time the Cycloud Controller ran in the “Last Run Results” column.
Cycloud Controller Fault Tolerance
The Cycloud Controller Service has been developed to work alongside other Servers running the Cycloud Controller service. This provides fault tolerance at this level ensuring that provisioning tasks continue in the event of a Cycloud Controller failure.
Each Cycloud Controller is aware of other Controllers via the Cycloud Data Store and work in harmony with each other ensuring that provisioning tasks are not replicated.
For production environments it is advised that two Cycloud Controllers are used. Although there is no limit to the number of Cycloud Controllers that can be implemented there is little advantage to having more than two.
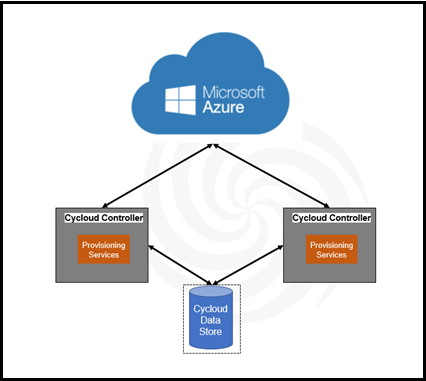
For proof of concept testing it is recommended that a single Cycloud Controller be installed (if necessary) on a Domain Controller.
Cycloud Agent
The Cycloud Agent Service is an optimised Windows scheduled task that provides operational logic for many aspects of Cycloud Agent services. These include tasks required to ensure ongoing operational delivery of Cycloud functionality to users as well as the ongoing orchestration of Cycloud provisioning and deprovisioning tasks. It’s Installer automates various steps required to install the Cycloud “Agent Service” efficiently and easily.
It is strongly advised that the required information is at hand prior to beginning the installation to prevent any confusion that may terminate the installation. Again, this document will highlight the required information and where it can be obtained.
Information Required Prior to Running the Installer
Information regarding the Microsoft file share that is to be used for the Cycloud Data Store is also required. This is simply the UNC path to the share location. This could be an existing file share (with the appropriate permissions etc) or a file share created using the process explained later in this guide. In either case the Microsoft Share information is simply the file share name in UNC format. It is crucial that the UNC path used uses a fully qualified Domain name. This is because when Cycloud Agents boot up they may not have access to NetBios services which makes finding Domain Controllers impossible therefore DNS is more reliable and is a requirement. Example: <\\ServerName.Domain_name\ShareName>
The Cycloud user name and password as well as where this user object exists in Active Directory. Details can be found here.
Cycloud Agent Installation
Image Creation Process
It is important to note that the Cycloud Agent has been designed to install onto a “gold image”. A gold image is a centrally stored copy of a virtual machine image that is used for replication purposes and to deploy working virtual machines to users.
There are many steps to creating a gold image and these may be specific to each deployment and user case however the following steps (although high level and simplified) are specific to Cycloud’s requirements and reflect a generalised version of events that will provide the bases of the process used in this section.
Although there is no foreseen reason that “custom images” would not work with Cycloud, for the purposes of this document it is assumed that virtual machines are going to be created from images available though the Azure Market Place. Let’s look at each of these steps in detail.
Step 1
Creating a virtual machine is a simple process. The following articles should assist in this task. Quick Guide Create VM with Azure Using a Generalized VHD
Step 2
A gold image typically contains applications and specific settings required by the administrator for users and system specific various purposes. As gold images are replicated and could be used by any number of users it is crucial that any aspect of the software and settings installed do not hold any unique data or configuration that is specific to any specific users or machines. There maybe special considerations on an application by application basis so please consult the software vendors recommendations.
Step 3 (Cycloud Agent Installation)
The Cycloud Agent software is part of the Cycloud Product software available for download from the Cycloud download page. Installation can be installed via the Cycloud unified installer (Recommended) or directly from it’s own installer executable “Cycloud-Agent-Install.exe”. These processes are simple and similar to each other in that they are identical from the acceptance of the Cycloud EULA.
Unzip and save the software to a local location on the machine that is to be the Cycloud Agent.
Browse to the directory containing the Cycloud Agent software and find the “Cycloud-Agent-Install.exe” file. Double clicking this file will begin the installation.
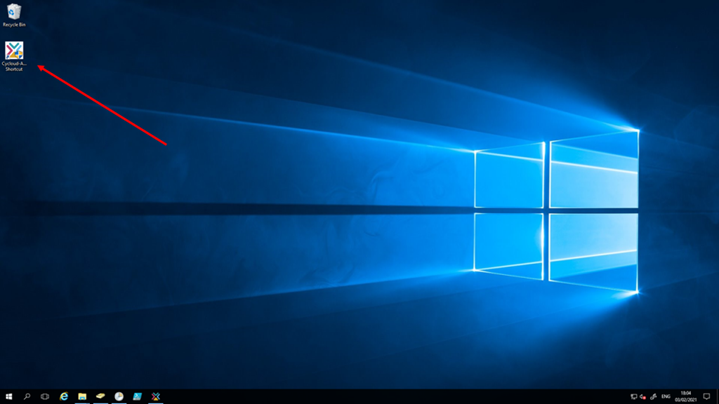
During the installation of the Cycloud Agent software a shortcut is placed onto the users desktop. This shortcut can be used to run the Cycloud Agent installation at any time. This is optional however this shortcut is removed at the end of the Cycloud Agent installation prior to Sysprep being executed which is covered later in this section.

The first thing that is required is to read and accept the Cycloud EULA. The installation will not continue until the EULA is agreed.
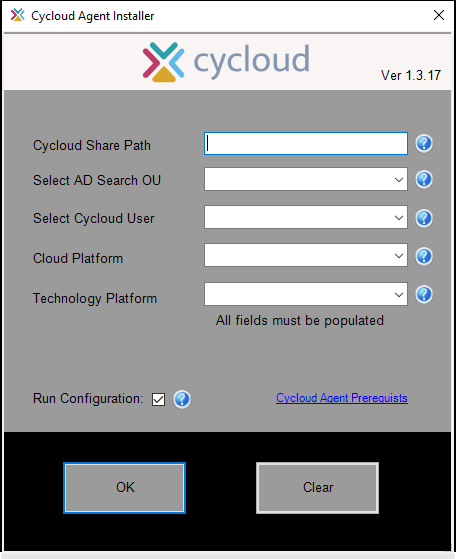
The next form askes for some crucial information to allow the Cycloud Agent to connect to the Cycloud Datastore, Active Directory and Azure infrastructures. We will look at each of these fields in the remainder of this section.
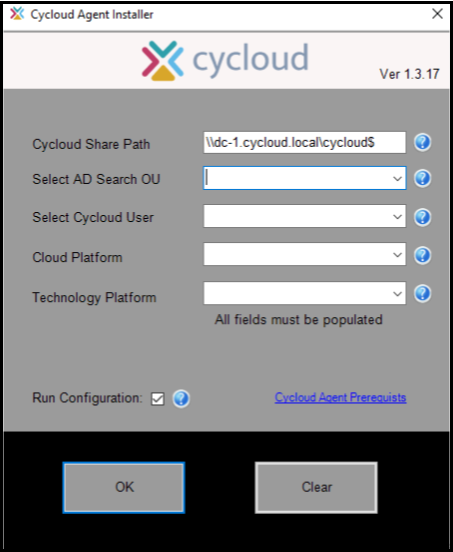
The first field provides the UNC path to the Cycloud Datastore. It is important to enter the Server name as a fully qualified domain name as in the example screenshot above. There are a number of technical reasons for this and the installation will not allow the user to continue until a valid share is found using the provided FQDN of the Server hosting the Cycloud Datastore. The help bubble by the side of each field explains more about each field and what data to enter.

The second field enumerates OUs and containers in Active Directory. This will in turn populate the following field with users existing in the selected OU which should include the Cycloud User. The Cycloud user would have been created when the Cycloud Product Installer was completed. You can get more information at the following link. Cycloud Product Installation
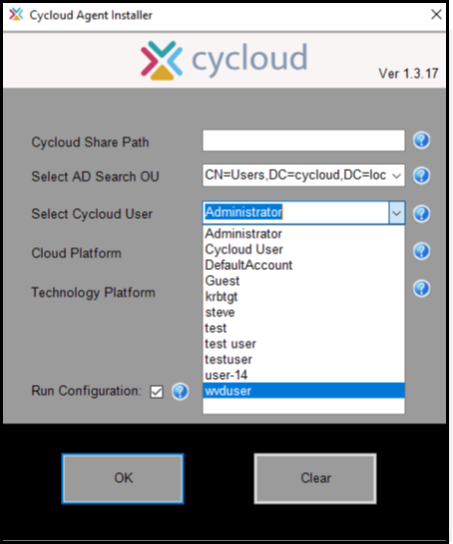
The Cycloud User can now be selected from the “Select Cycloud User” field.
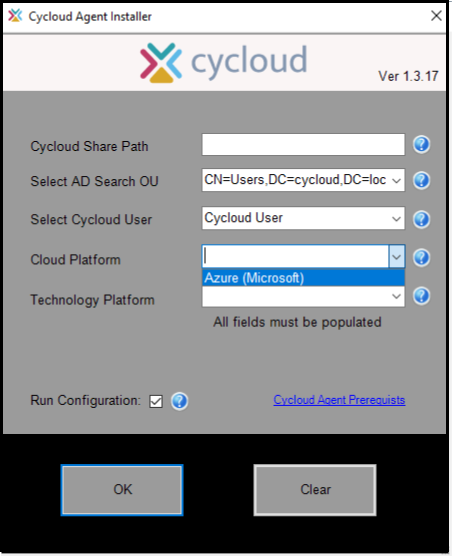
In the 1.3.17 release the “Cloud Platform” support is limited to Microsoft Azure so this can be selected however support for other cloud platforms may be supported in later releases.
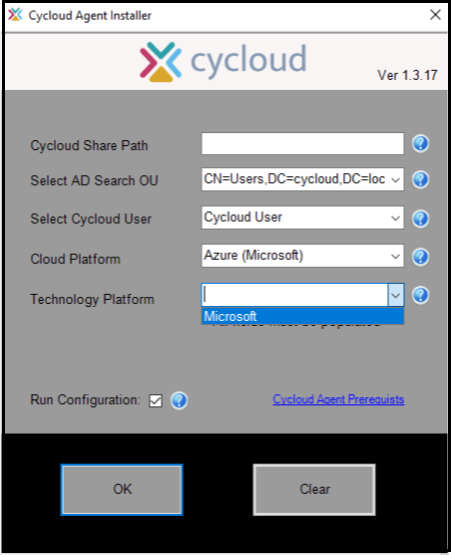
In the 1.3.17 release the “Technology Platform” support is limited to Microsoft (AVD) and Citrix so either of these technologies can be selected however support for further technology platforms will be considered for later releases.

Once all the fields have been populated (This is a mandatory requirement) the form is then ready to be submitted by selecting the ok button which would complete the installation stage of the Cycloud Agent however a decision is required whether to run the configuration of the Cycloud Agent at this point. This can be achieved by checking the “Run Configuration” check box.
There are reasons as to why the Cycloud Agent may need to be installed but not configured. One reason is that it may not have been decided as to what host pools (if using AVD) or delivery groups (if using Citrix Virtual Apps and Desktops) the agent is to be assigned but installing the Cycloud Agent can be completed as this would reduce the need to do this later in the process.
Assuming that the “Run Configuration” check box was selected the following form will be presented after submission. Note that in this example AVD has been selected so the Azure Resource Group and Host Pools are enumerated. If Citrix was selected then Citrix Machine Catalogues and Delivery Groups would be shown.
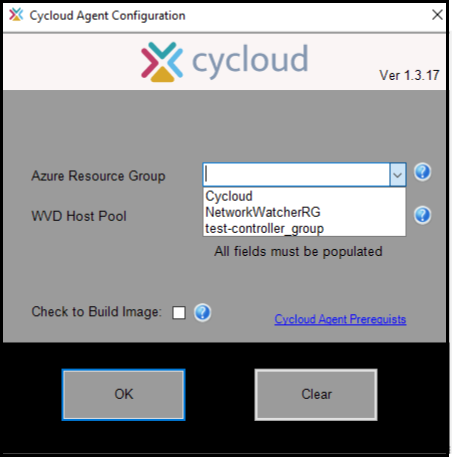
In the case of Microsoft AVD as host pools can exist in many different Azure resource groups the first field allows the user to select the Azure resource group they want to browse for the host pool. This is not the same in respect of Citrix Virtual Apps and Desktops as there are no links between Machine Catalogues and Delivery Groups
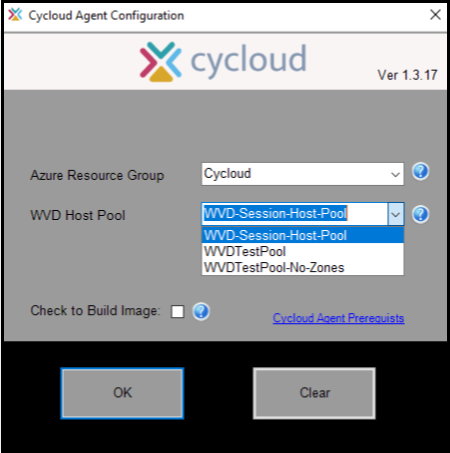
The second field displays the available host pools (in the case of AVD) or Delivery Groups (in the case of Citrix Virtual Apps and Desktops). The host pool or Deliver Group selected is where machines are placed from this gold image.
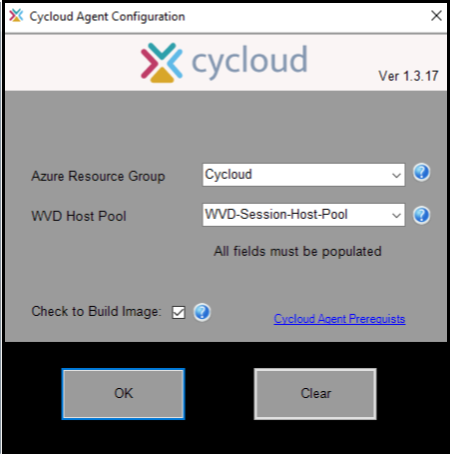
When all fields are populated (This is a mandatory requirement) the form can be submitted. There is a further decision to be made regarding the “Check to Build Image” check box. Checking this box will enter the last step of the process by making the machine ready for Azure imaging and ready for deployment.
When the form is submitted (if there is no existing configuration found) a configuration is created in the Cycloud datastore. The configuration will contain the information selected during the Cycloud Agent configuration process as well as other information required to provision and deprovision machines.
Even at this point the Cycloud Agent can be installed and configured without being made into an image. This maybe appropriate in order to add further applications or configuration details at a later date.
Assuming that the “Check to Build Image” check box was selected the following form will be presented after submission.
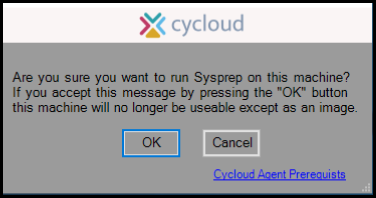
This is the very last point at which the user can abort a “Sysprep”. If ok is selected at this point it will render the machine usable as a working machine so beyond this point the machine will only be useable for creating an image.
Sysprep is required to be run before an image can be created. It is important to only run Sysprep from the Cycloud Agent installer. This is because the Cycloud Agent installation software performs a number of additional tasks.
Step 4
After Sysprep has been run the machine will have been generalized and closed down. The machines active directory machine object is also removed. It is now ready to be made into an Azure managed image. This process is relatively simple and can be achieved in a number of ways. The following links may be useful to gain more detailed information regarding Sysprep and Azure imaging requirements. Creating a managed image of a generalized VM in Azure Create a VM from a managed image
Step 5
Now that an image has been created the Cycloud Control Centre can be used to configure provisioning schedules and other policies. Please consult the Cycloud Administrators Guide following documents for further information.